Spring FrameWork一、 前言二、IOC(控制反转)2.1 对于IOC的理解2.2如何使用IOC2.3配置文件的解读2.4IOC容器创建bean的两种方式2.5从IOC容器中取bean2.6bean的属性如果包含特殊字符 三、DI(依赖注入)四、Spring中的bean五、Spring中的继承六、Spring的依赖七、Spring读取外部资源八、Spring的p命名空间九、Spring工厂方法9.1静态工厂方法9.2实例工厂方法 十、Spring IOC 自动装配 autowire10.1自动装配10.2 Spring IOC基于注解的开发10.3实际开发中的使用 十一、Spring AOP
文章是看楠哥的视频写的笔记
这篇博客内容把Spring的基本知识点都讲到了,篇幅比较长,大家可以用于复习,也可以在学习相关知识点的时候,来看看对应内容。对于一些难点,IOC,AOP等,我通过流程图,代码,文字结合来进行讲解,可以更好的理解
Spring FrameWork
一、 前言
Spring是当前Java开发的行业标准,第一框架Spring FrameWork已经从最初取代EJB的框架逐步发展成一套完整的生态,最新的版本是5.xSpring架构体系图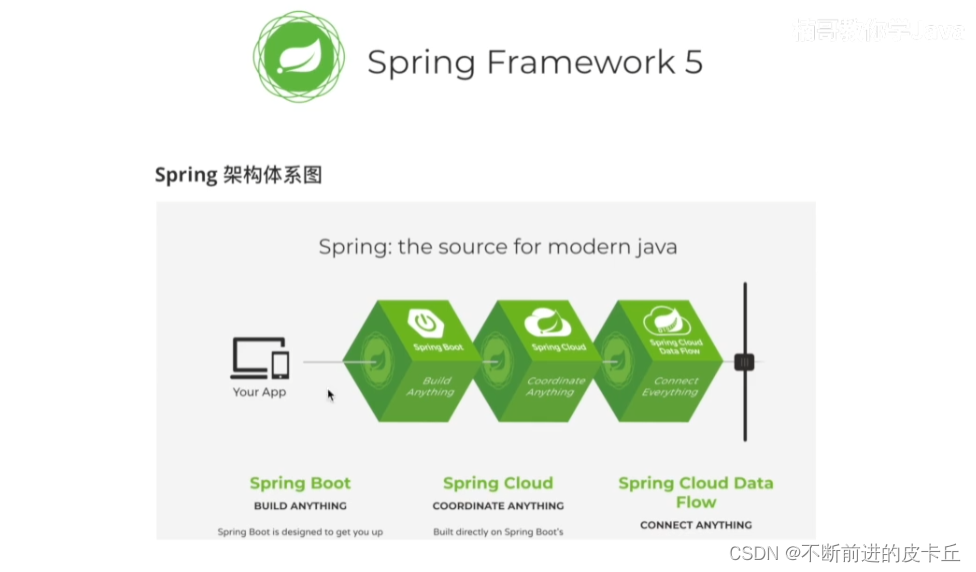 Spring两大核心机制: IOC:工厂模式AOP:代理模式
 二、IOC(控制反转)
2.1 对于IOC的理解
传统开发中,需要调用对象的时候,需要调用者手动来创建被调用者的实例,即对象是由调用者new出来的
但是在Spring框架中,创建对象的工作不再由调用者来完成,而是交给IOC容器来创建,再推送给调用者,整个流程完成反转,所以是控制反转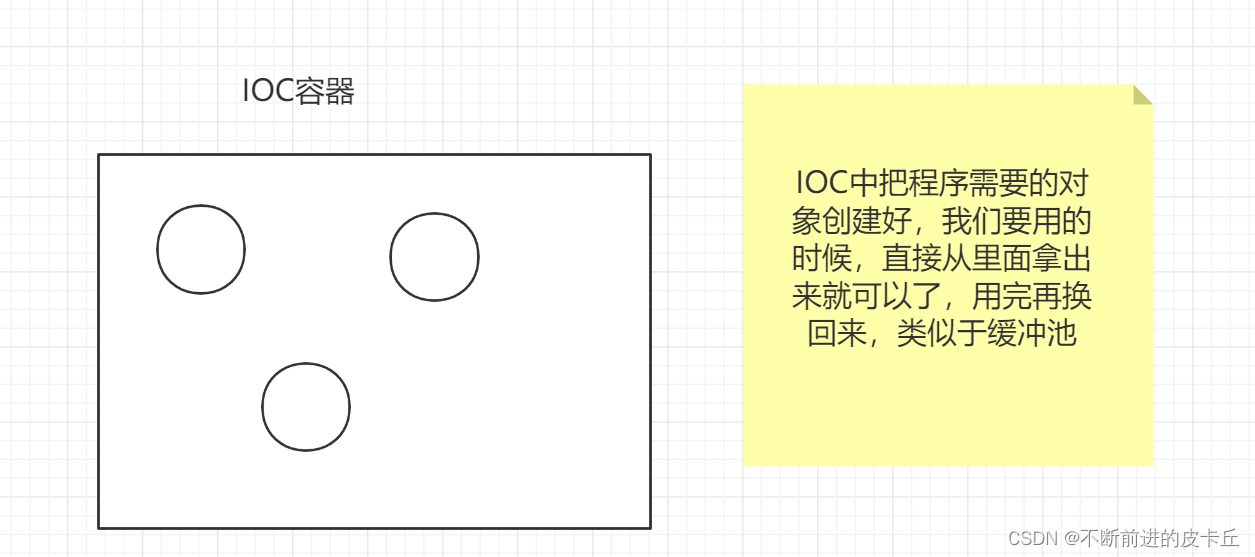
就比如说假设买东西,以前我们需要自己去超市买东西,但是现在我们可以不用自己去超市,我们只要把购物袋放在家门口,IOC就会自己去把我们想要的东西买回来,然后放在袋子里面,我们打开袋子拿起来用就可以了
IOC的特点是解耦合。
比如说A需要用到B,传统的开发,我们要直接创建B的实例,但是在Spring中,IOC这个容器会创建B的实例,然后把这个B注入到A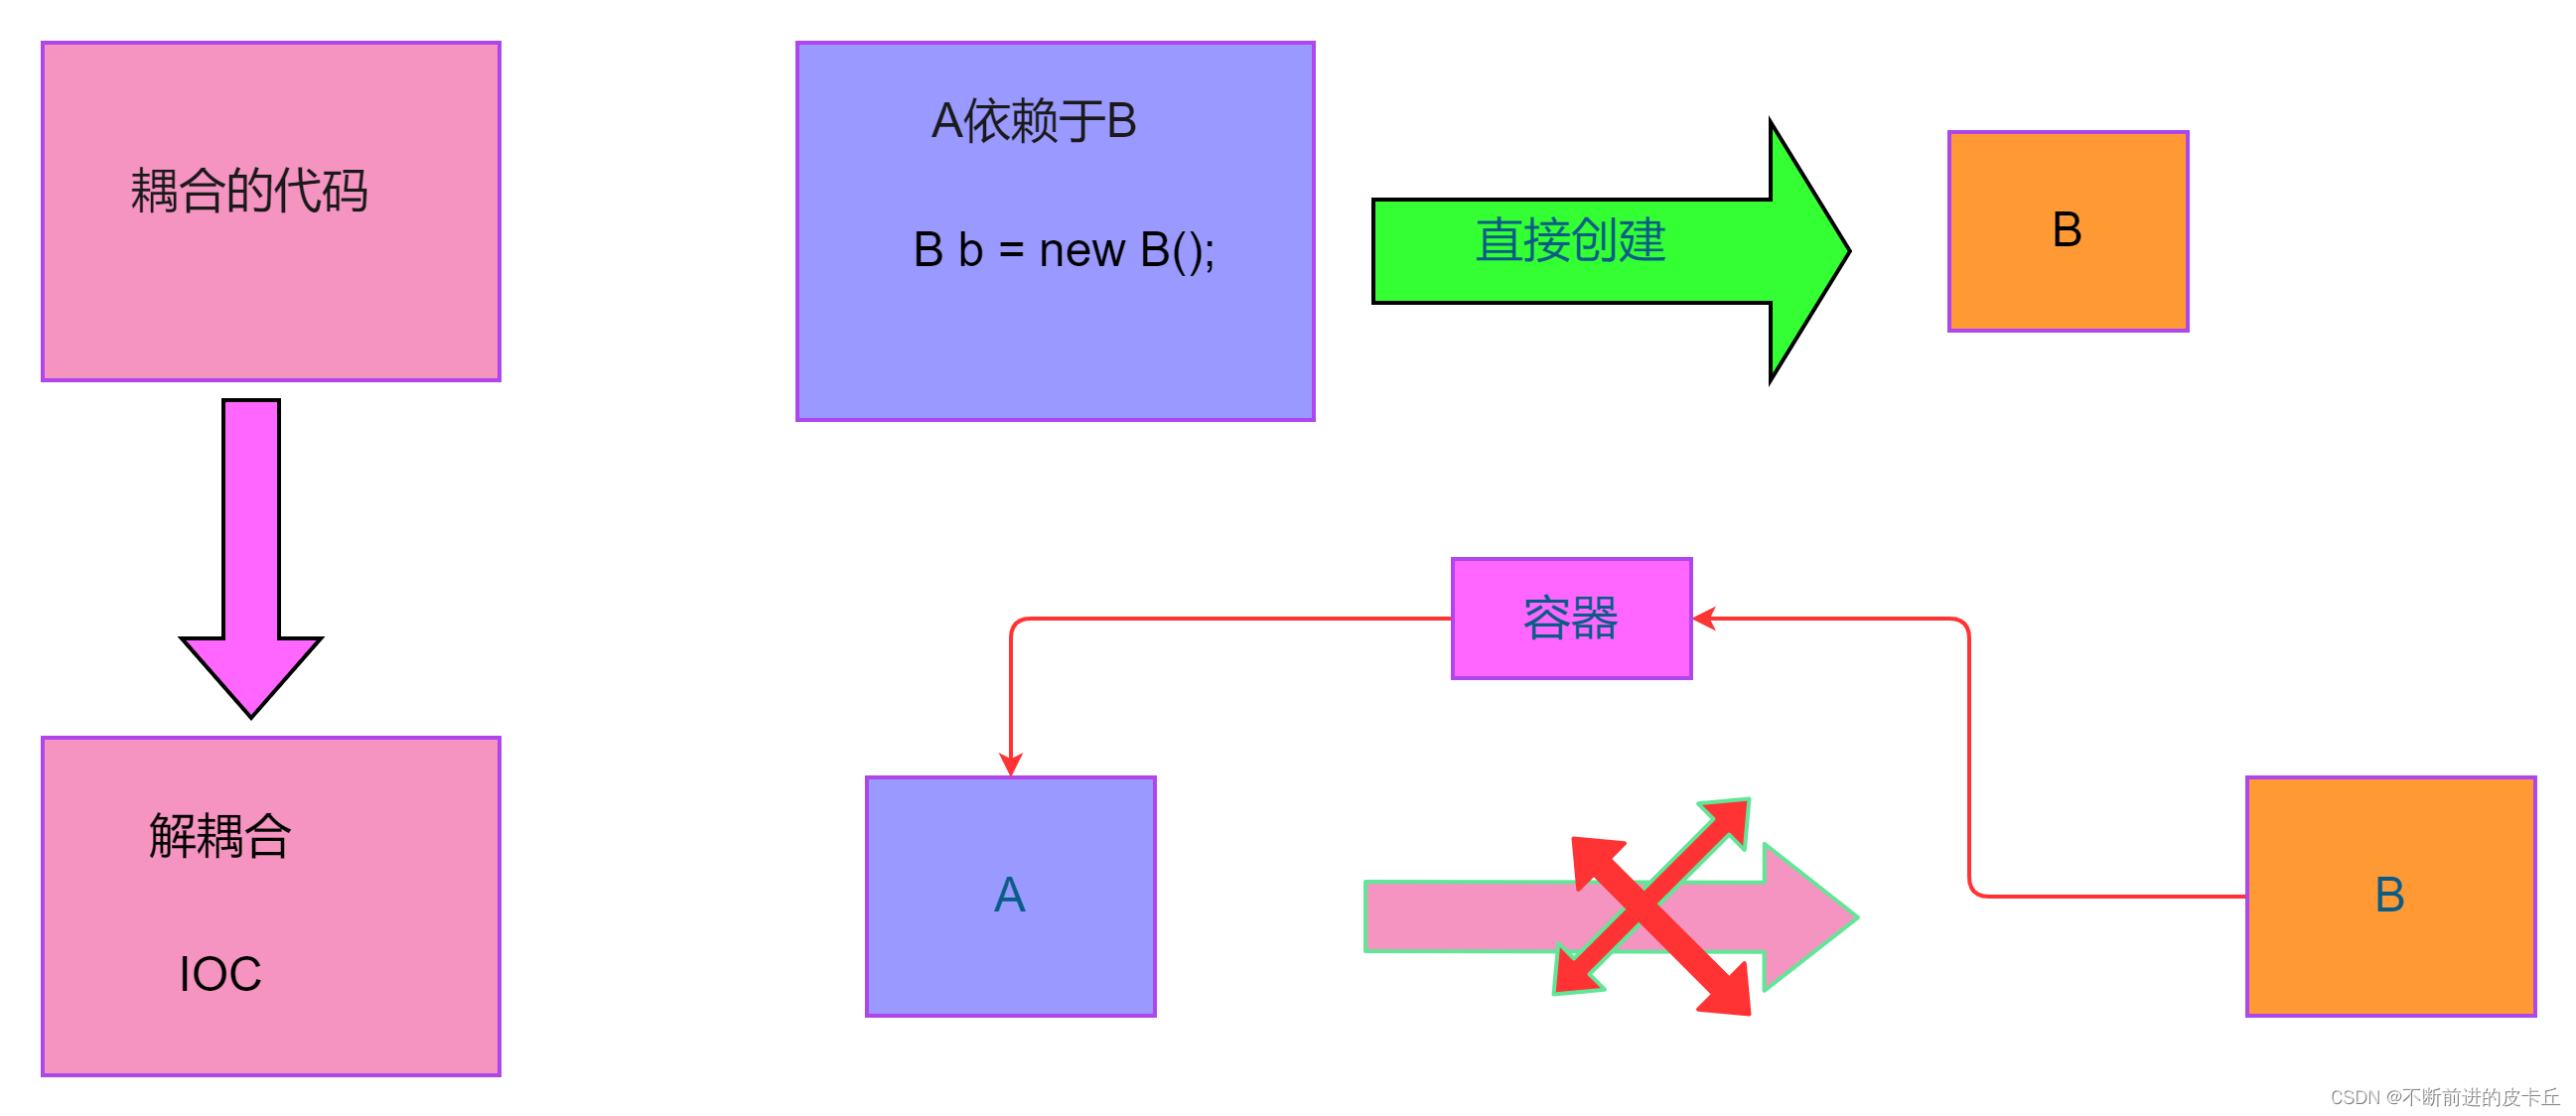
2.2如何使用IOC
创建maven工程,在pom.xml中导入相关依赖<?xml version="1.0" encoding="UTF-8"?><project xmlns="http://maven.apache.org/POM/4.0.0" xmlns:xsi="http://www.w3.org/2001/XMLSchema-instance" xsi:schemaLocation="http://maven.apache.org/POM/4.0.0 http://maven.apache.org/xsd/maven-4.0.0.xsd"> <modelVersion>4.0.0</modelVersion> <groupId>org.example</groupId> <artifactId>springioc</artifactId> <version>1.0-SNAPSHOT</version> <properties> <maven.compiler.source>8</maven.compiler.source> <maven.compiler.target>8</maven.compiler.target> </properties> <dependencies> <dependency> <groupId>org.springframework</groupId> <artifactId>spring-context</artifactId> <version>5.3.18</version> </dependency> </dependencies></project>public class Student { private long id; private String name; private int age; public long getId() { return id; } public void setId(long id) { this.id = id; } public String getName() { return name; } public void setName(String name) { this.name = name; } public int getAge() { return age; } public void setAge(int age) { this.age = age; } @Override public String toString() { return "Student{" + "id=" + id + ", name='" + name + '\'' + ", age=" + age + '}'; }}<?xml version="1.0" encoding="UTF-8"?><beans xmlns="http://www.springframework.org/schema/beans" xmlns:xsi="http://www.w3.org/2001/XMLSchema-instance" xsi:schemaLocation="http://www.springframework.org/schema/beans http://www.springframework.org/schema/beans/spring-beans.xsd"> <bean id="stu" class="com.zyh.pojo.Student"></bean></beans> Student stu =new Student(); stu .setAge(25); stu.setId(1001); stu.setName("张三"); System.out.println(stu);bean标签来创建对象就像买菜一样,我们不需要自己亲自买,但是要写一张单子,告诉说要买什么,程序也是类似的,我们要告诉Spring框架要创建哪些对象,怎样创建对象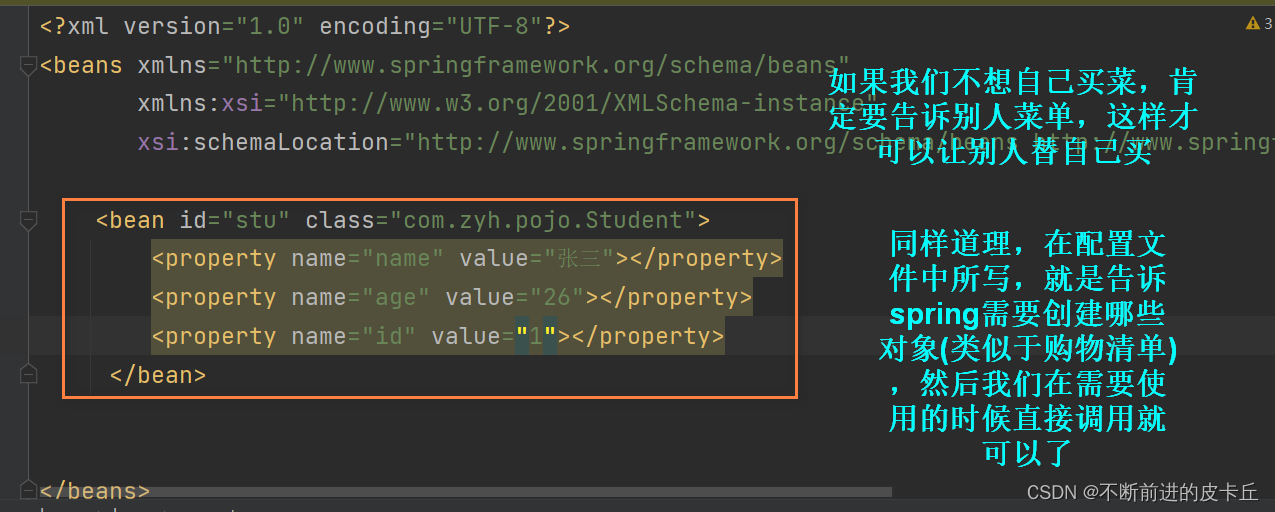 调用API,从IOC获取对象
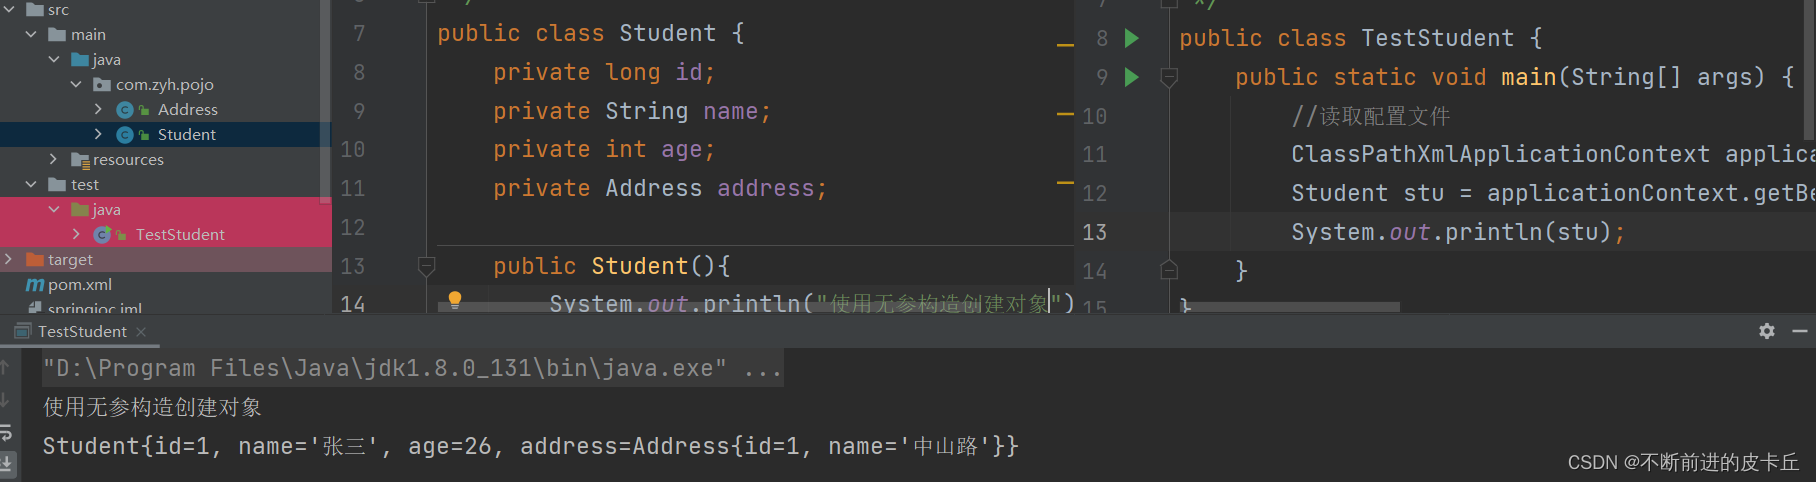
 //读取配置文件 ClassPathXmlApplicationContext applicationContext = new ClassPathXmlApplicationContext("applicationContext.xml"); Student stu = applicationContext.getBean("stu", Student.class); System.out.println(stu);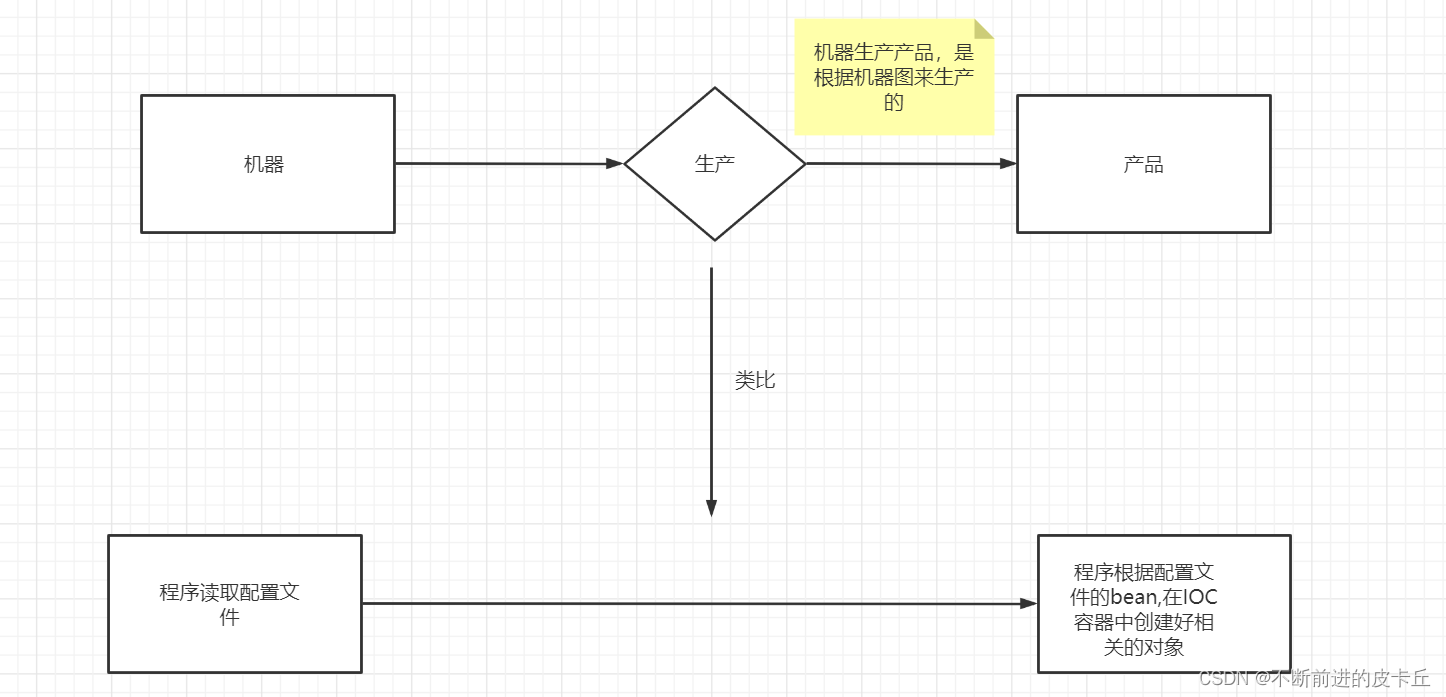
2.3配置文件的解读
通过配置bean标签来完成对象的管理id:对象名class:对象的模板类(所有交给IOC容器来管理的类必须要有无参构造函数,因为Spring底层是通过反射机制来创建对象,调用的是无参构造)对象的成员变量通过property标签完成赋值 name:成员变量名value:成员变量值(基本数据类型,String可以直接赋值,如果是其他引用类型不可以通过value赋值)ref:把IOC中的另一个bean赋给当前成员变量(DI)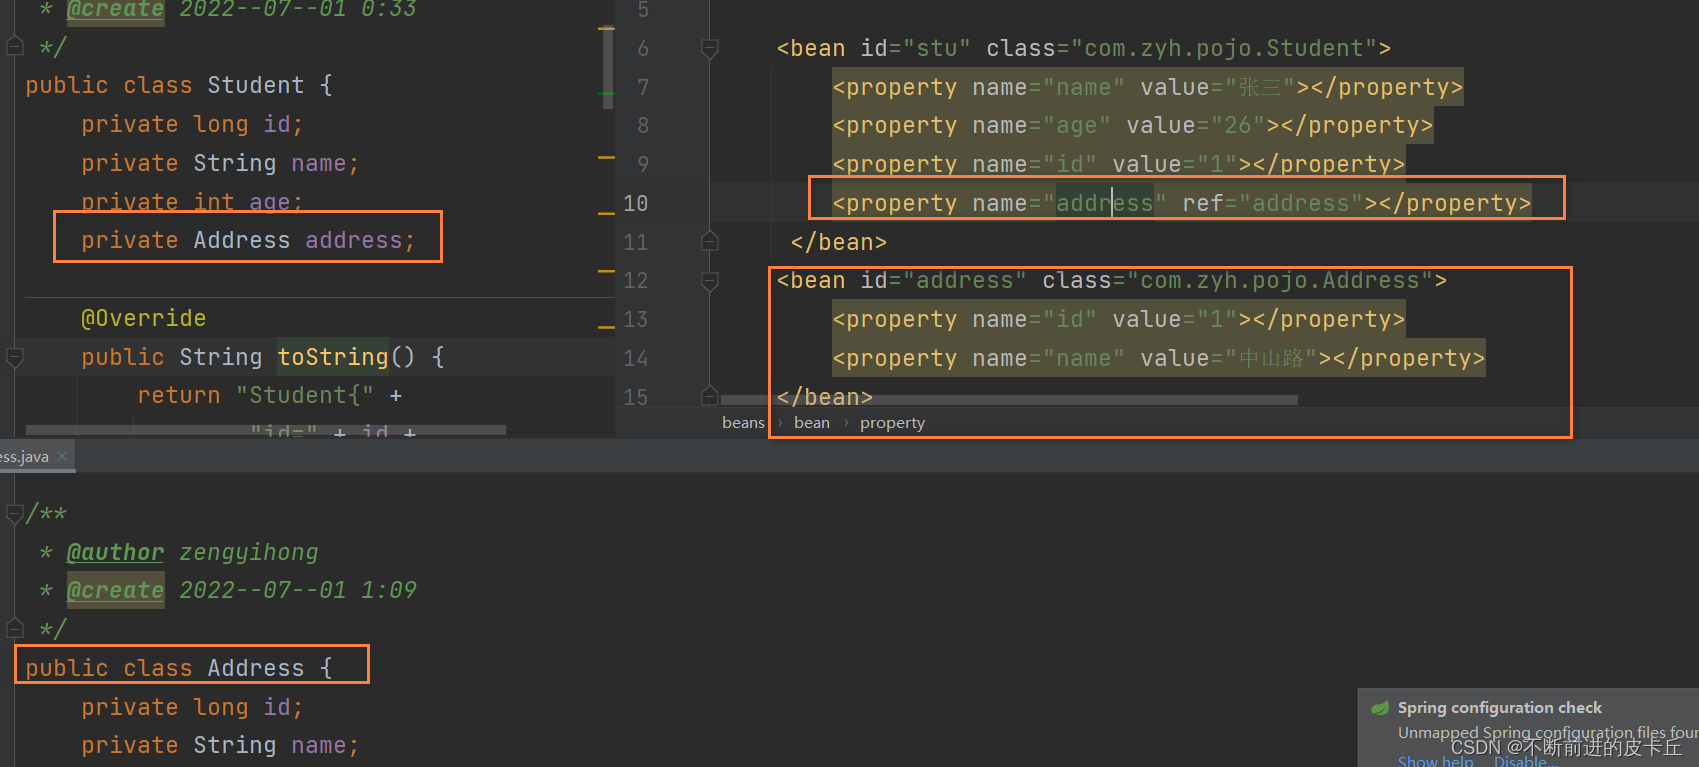
2.4IOC容器创建bean的两种方式
无参构造函数(需要提供对应的set方法)
有参构造函数
<bean id="stu1" class="com.zyh.pojo.Student"> <constructor-arg name="id" value="1"> </constructor-arg> <constructor-arg name="name" value="李四"></constructor-arg> </bean> <bean id="stu1" class="com.zyh.pojo.Student"> <constructor-arg index=0 value="1"> </constructor-arg> <constructor-arg index=1 value="李四"></constructor-arg> </bean>2.5从IOC容器中取bean
通过id取值 Student stu = (Student)applicationContext.getBean("stu"); Student stu = applicationContext.getBean( Student.class);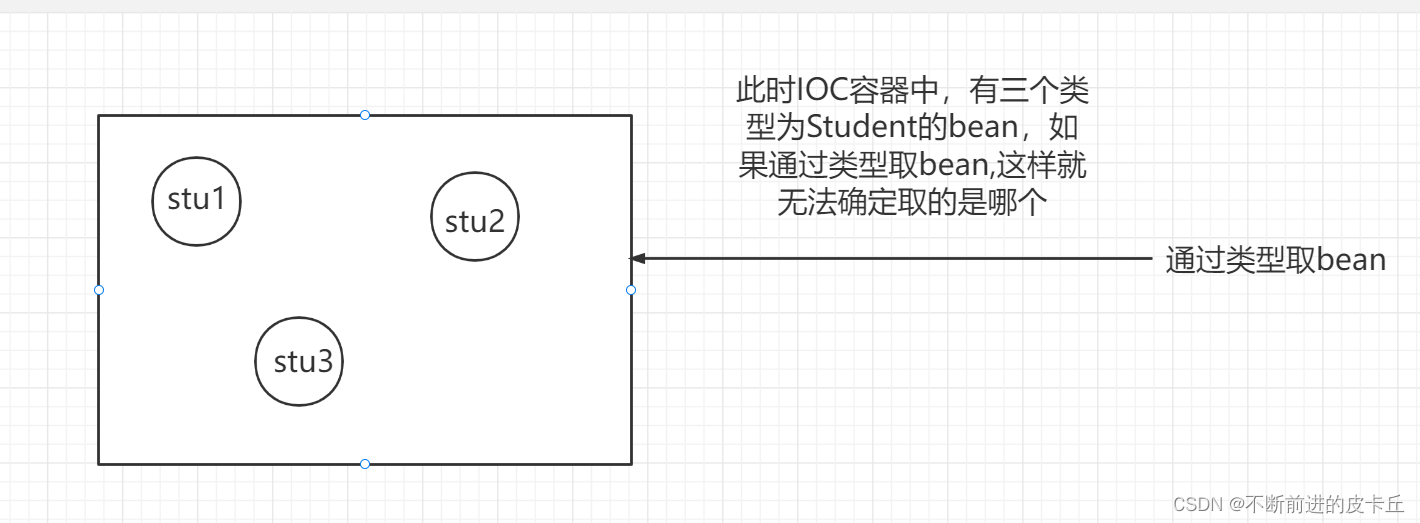
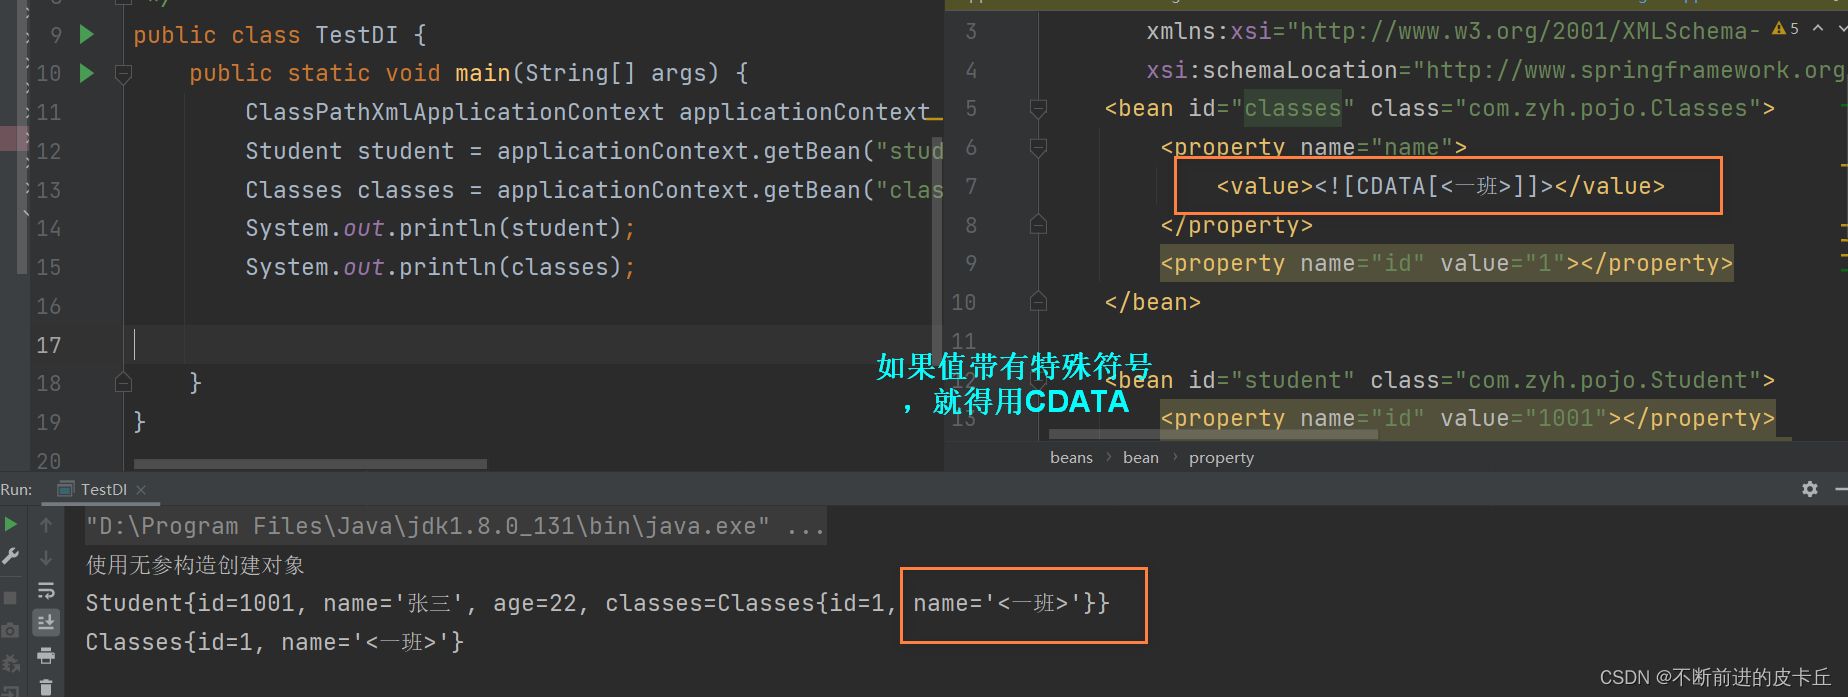
2.6bean的属性如果包含特殊字符
三、DI(依赖注入)
DI:指bean之间的依赖注入,设置对象之间的级联关系Classespublic class Classes { private Integer id; private String name; 还有对应的get,set方法}public class Student { private long id; private String name; private int age; private Classes classes; public Student(){ System.out.println("使用无参构造创建对象"); } public Student(long id,String name){ this.id = id; this.name = name; } public Classes getClasses() { return classes; } public void setClasses(Classes classes) { this.classes = classes; } public long getId() { return id; } public void setId(long id) { this.id = id; } public String getName() { return name; } public void setName(String name) { this.name = name; } public int getAge() { return age; } public void setAge(int age) { this.age = age; } @Override public String toString() { return "Student{" + "id=" + id + ", name='" + name + '\'' + ", age=" + age + ", classes=" + classes + '}'; }}applicationContext-di.xml
<?xml version="1.0" encoding="UTF-8"?><beans xmlns="http://www.springframework.org/schema/beans" xmlns:xsi="http://www.w3.org/2001/XMLSchema-instance" xsi:schemaLocation="http://www.springframework.org/schema/beans http://www.springframework.org/schema/beans/spring-beans.xsd"> <bean id="classes" class="com.zyh.pojo.Classes"> <property name="name" value="1班"></property> <property name="id" value="1"></property> </bean> <bean id="student" class="com.zyh.pojo.Student"> <property name="id" value="1001"></property> <property name="name" value="张三"></property> <property name="age" value="22"></property> <property name="classes" ref="classes"></property> </bean></beans>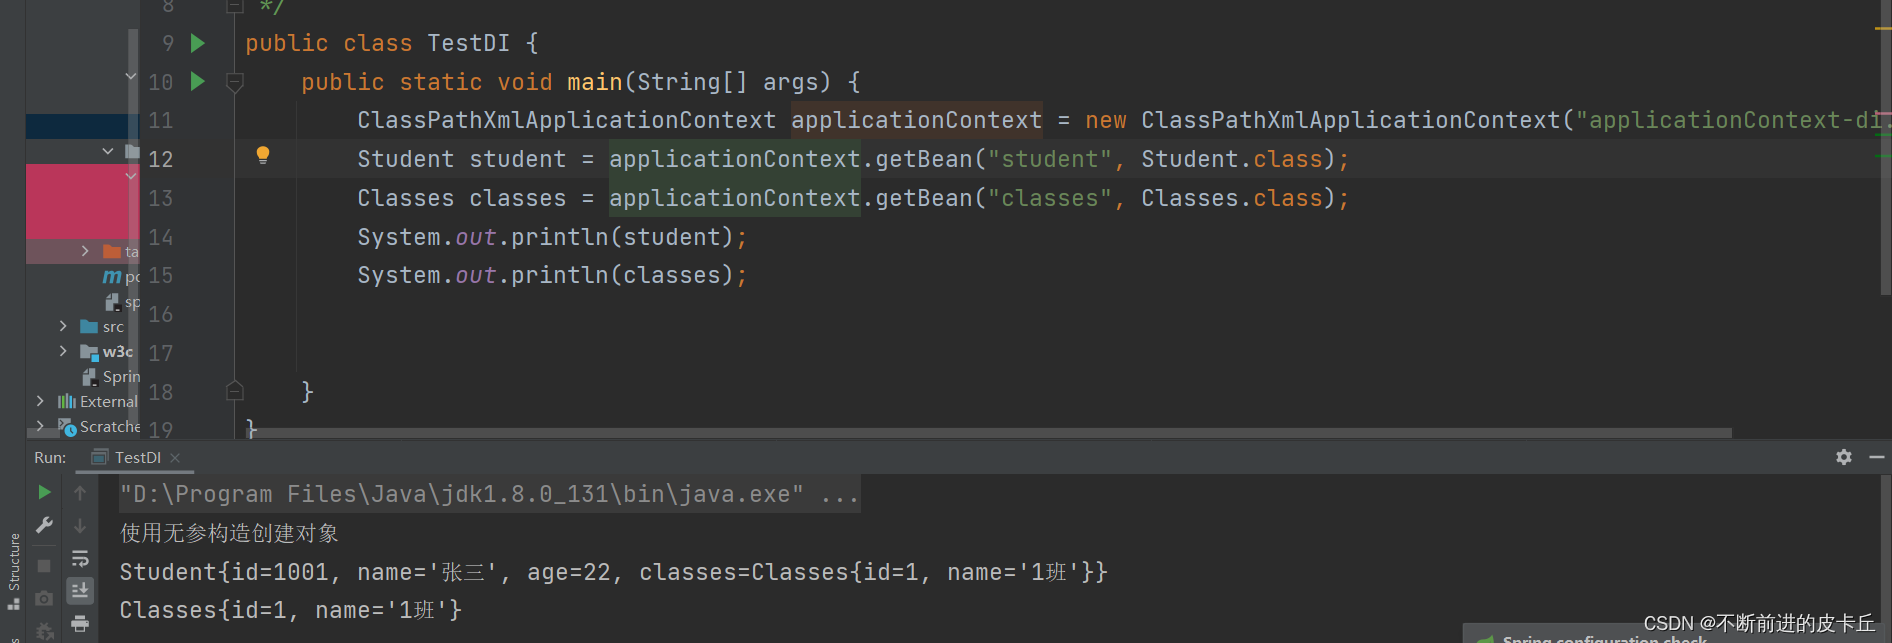
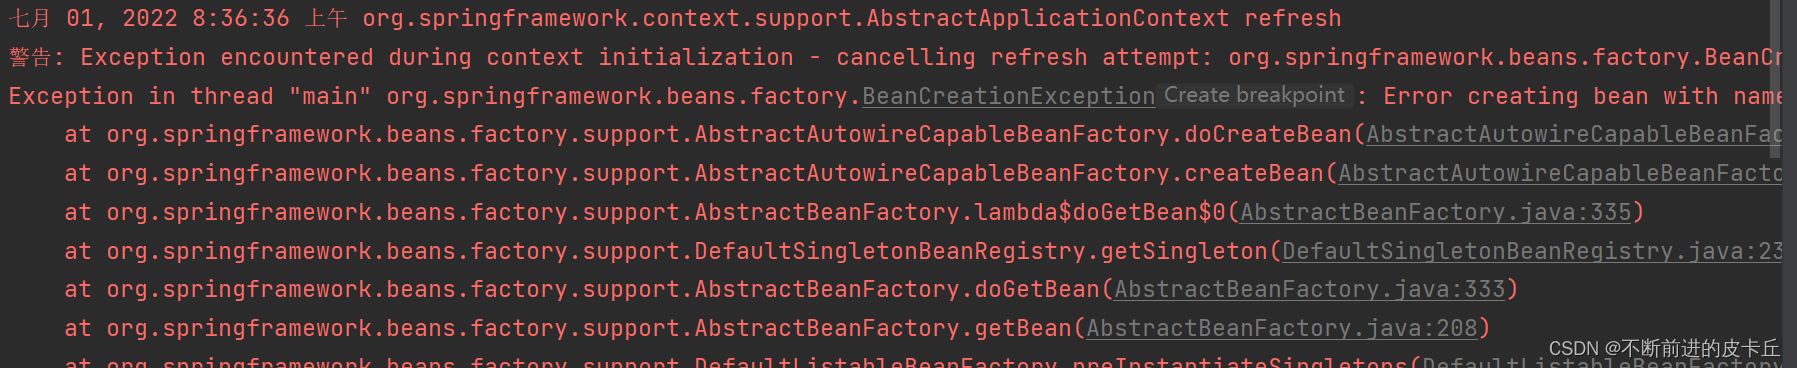
bean之间的级联需要使用ref属性,而不能用value属性,否则会抛出类型转换异常

<?xml version="1.0" encoding="UTF-8"?><beans xmlns="http://www.springframework.org/schema/beans" xmlns:xsi="http://www.w3.org/2001/XMLSchema-instance" xsi:schemaLocation="http://www.springframework.org/schema/beans http://www.springframework.org/schema/beans/spring-beans.xsd"> <bean id="classes" class="com.zyh.pojo.Classes"> <property name="name" value="1班"></property> <property name="id" value="1"></property> <property name="studentList"> <list> <ref bean="student"></ref> <ref bean="student2"></ref> </list> </property> </bean> <bean id="student" class="com.zyh.pojo.Student"> <property name="id" value="100"></property> <property name="name" value="张三"></property> <property name="age" value="22"></property> <property name="classes" ref="classes"></property> </bean> <bean id="student2" class="com.zyh.pojo.Student"> <property name="id" value="200"></property> <property name="age" value="18"></property> <property name="name" value="李四"></property> <property name="classes" ref="classes"></property> </bean></beans>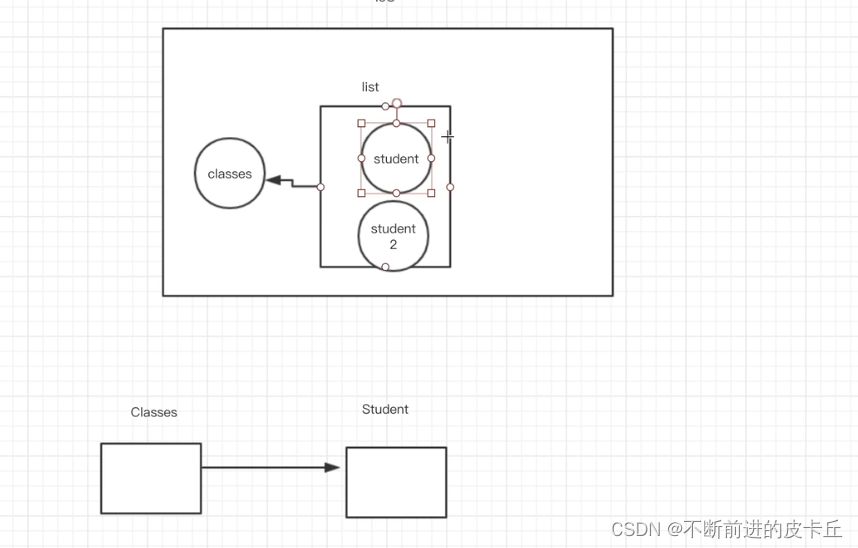
如果把学生装到班级里面,又把班级装到学生里面,就导致无限递归循环装配,最终栈溢出
四、Spring中的bean
bean是根据scope来生成的,表示bean的作用域,scope有4种类型
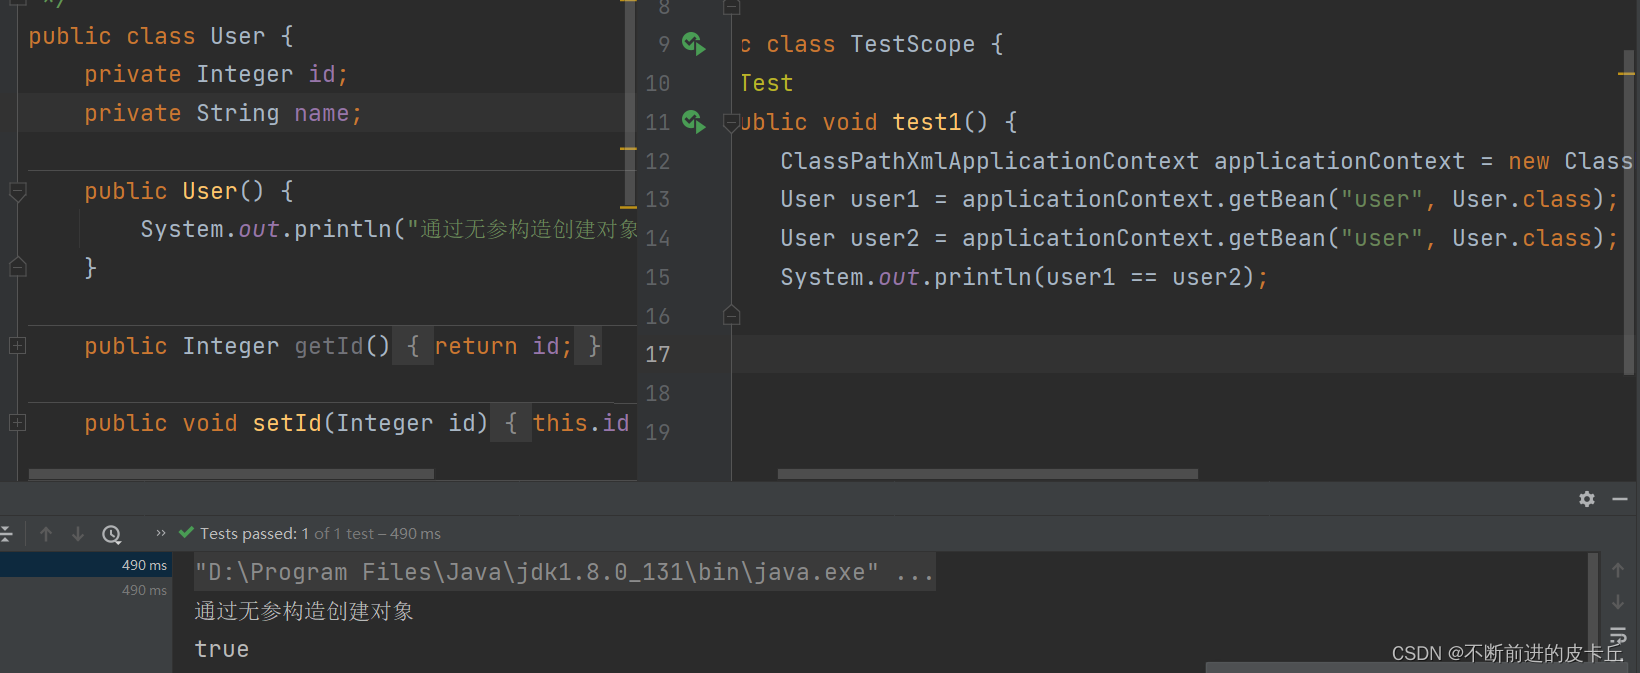
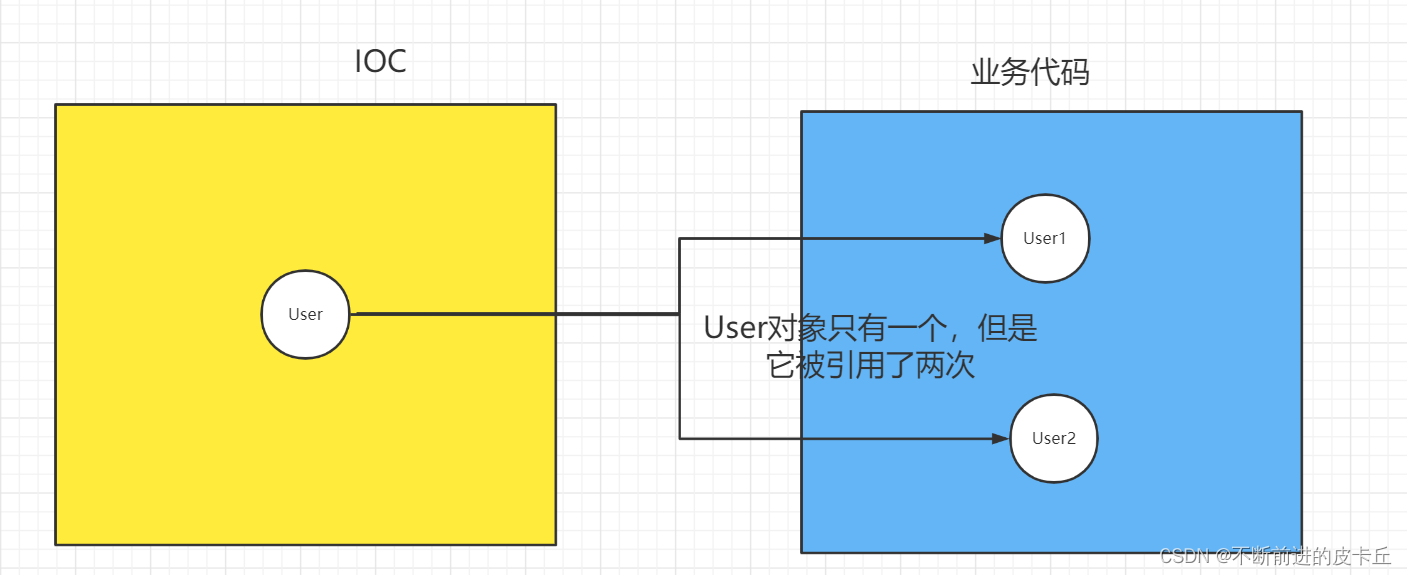
singleton,单例,表示通过Spring容器获取的对象是唯一的,是默认值

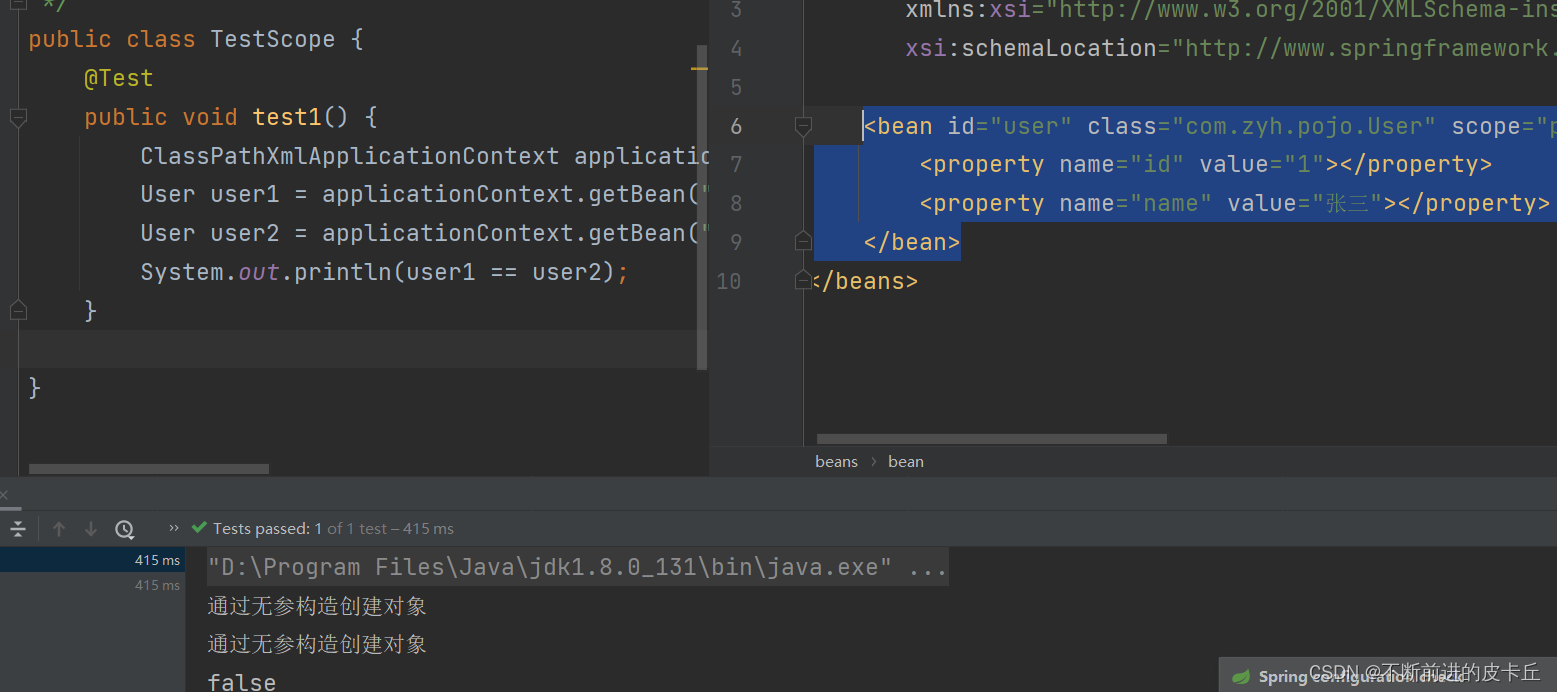
prototype,原型,表示通过Spring容器获取的对象是不同的
配置文件<bean id="user" class="com.zyh.pojo.User" scope="prototype"> <property name="id" value="1"></property> <property name="name" value="张三"></property> </bean>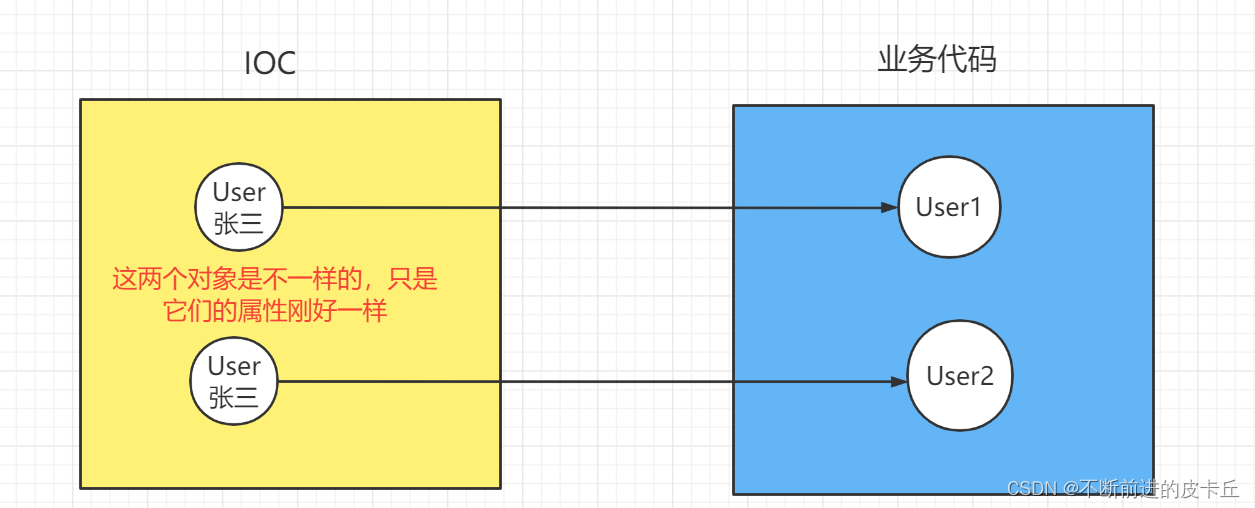
request和session一般用于web项目
singleton模式下,只要加载IOC容器,不管是否从IOC种取出bean,配置文件中的bean都会被创建,而且只会创建一个对象
prototype模式下,如果不从IOC中取出bean,则不创建对象,取一次bean,就会创建一个对象
五、Spring中的继承
Spring中的继承不同于Java中的继承
Java中的继承是针对于类的
Spring中的继承是针对于对象(bean)
<?xml version="1.0" encoding="UTF-8"?><beans xmlns="http://www.springframework.org/schema/beans" xmlns:xsi="http://www.w3.org/2001/XMLSchema-instance" xsi:schemaLocation="http://www.springframework.org/schema/beans http://www.springframework.org/schema/beans/spring-beans.xsd"> <bean id="user1" class="com.zyh.pojo.User" > <property name="id" value="1"></property> <property name="name" value="张三"></property> </bean> <bean id="user2" class="com.zyh.pojo.User" parent="user1"></bean></beans>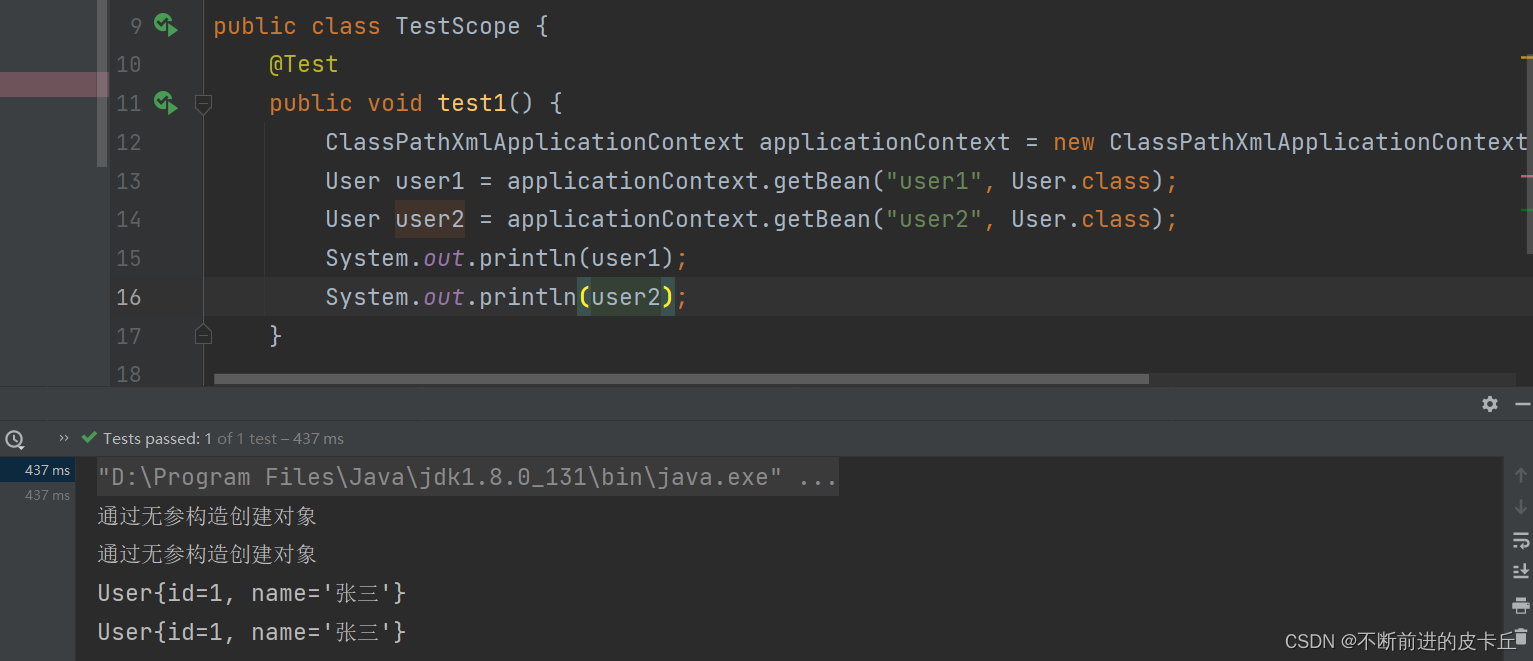
六、Spring的依赖
用来设置两个bean的创建顺序IOC容器默认情况下是通过applicationContext.xml中bean的配置顺序来决定创建顺序的,配置在前面的bean会先被创建在不更改applicationContext.xml配置顺序的前提下,通过设置bean之间的依赖关系来调整bean的创建顺序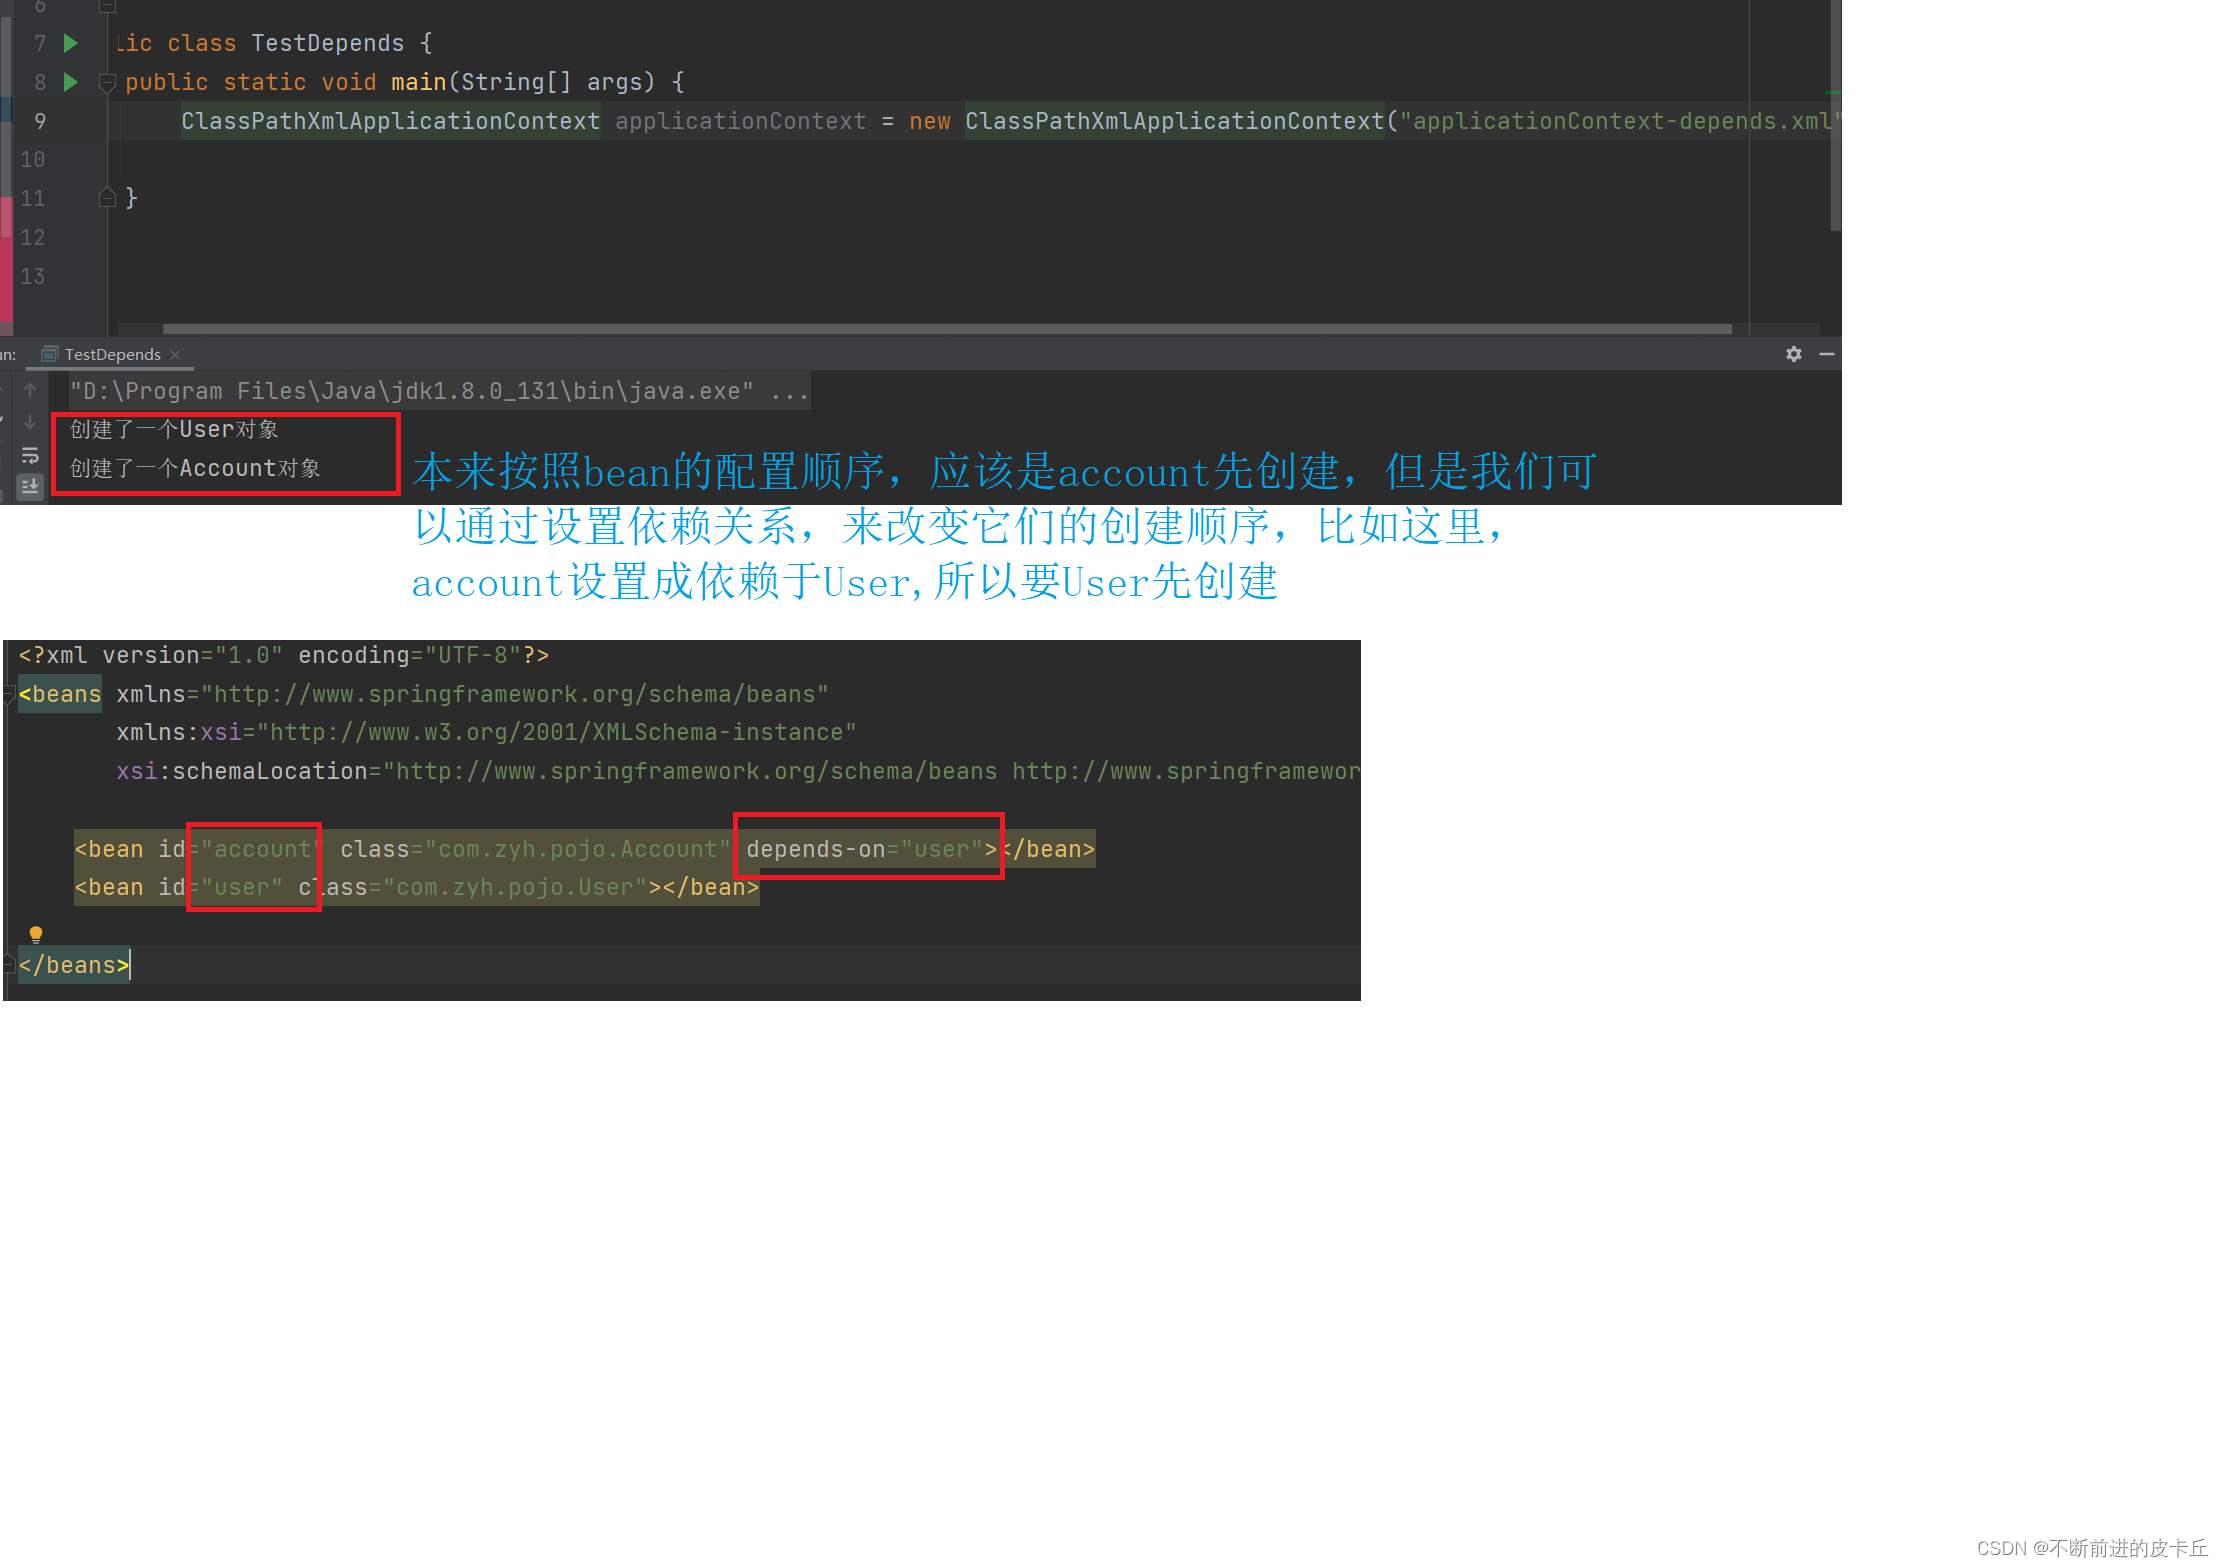
七、Spring读取外部资源
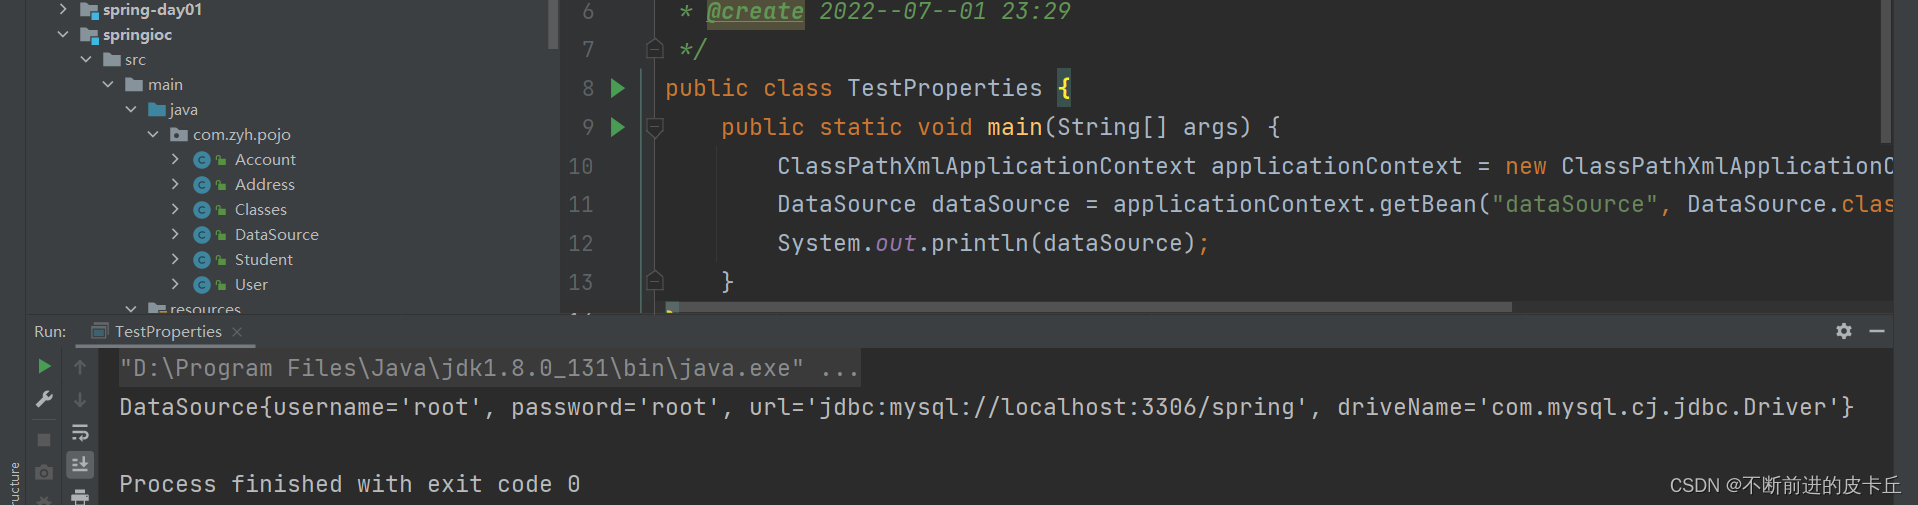
在实际开发中,数据库的配置会一般会单独保存到后缀为properties的文件,方便维护和修改如果用Spring来加载数据源,就需要在applicationContext.xml中读取properties中的数据,这就是读取外部资源jdbc.properties
user=rootpassword=rooturl=jdbc:mysql://localhost:3306/springdriverName=com.mysql.cj.jdbc.Driverspring-properties.xml
<?xml version="1.0" encoding="UTF-8"?><beans xmlns="http://www.springframework.org/schema/beans" xmlns:xsi="http://www.w3.org/2001/XMLSchema-instance" xmlns:context="http://www.springframework.org/schema/context" xsi:schemaLocation="http://www.springframework.org/schema/beans http://www.springframework.org/schema/beans/spring-beans.xsd http://www.springframework.org/schema/context https://www.springframework.org/schema/context/spring-context.xsd"> <!--导入外部资源 --> <context:property-placeholder location="classpath:jdbc.properties"></context:property-placeholder> <bean id="dataSource" class="com.zyh.pojo.DataSource"> <property name="username" value="${user}"></property> <property name="password" value="${password}"></property> <property name="url" value="${url}"></property> <property name="driveName" value="${driverName}"></property> </bean></beans>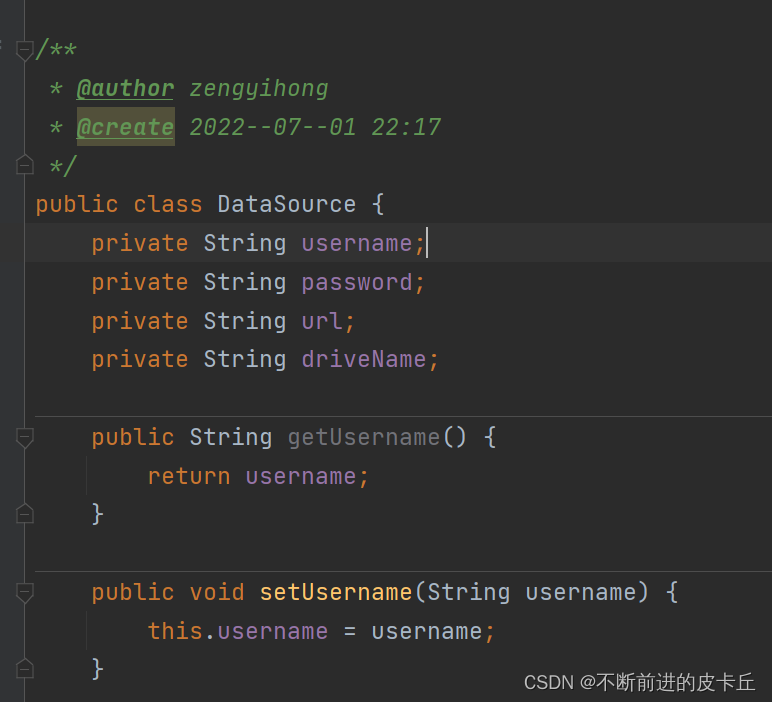
八、Spring的p命名空间
用来简化xml配置
<?xml version="1.0" encoding="UTF-8"?><beans xmlns="http://www.springframework.org/schema/beans" xmlns:xsi="http://www.w3.org/2001/XMLSchema-instance" xmlns:p="http://www.springframework.org/schema/p" xsi:schemaLocation="http://www.springframework.org/schema/beans http://www.springframework.org/schema/beans/spring-beans.xsd"> <bean id="stu" class="com.zyh.pojo.Student" p:id="1" p:age="10" p:name="张三" p:classes-ref="classes"></bean> <bean id="classes" class="com.zyh.pojo.Classes" p:name="一班" p:id="1"></bean></beans>九、Spring工厂方法
IOC通过工厂模式创建bean有两种方式:
静态工厂方法实例工厂方法静态工厂类不需要实例化,实例工厂类需要实例化9.1静态工厂方法
创建Car类public class Car { private Integer num; private String brand; public Car() { } public Car(Integer num, String brand) { this.num = num; this.brand = brand; } public Integer getNum() { return num; } public void setNum(Integer num) { this.num = num; } public String getBrand() { return brand; } public void setBrand(String brand) { this.brand = brand; } @Override public String toString() { return "Car{" + "num=" + num + ", brand='" + brand + '\'' + '}'; }}public class StaticCarFactory { private static Map<Integer, Car> carMap; static { carMap = new HashMap<>(); carMap.put(1, new Car(1, "奥迪")); carMap.put(2, new Car(2,"奥拓")); } /** * 写一个方法,从map集合取数据 */ public static Car getCar(Integer num ){ return carMap.get(num); }}<?xml version="1.0" encoding="UTF-8"?><beans xmlns="http://www.springframework.org/schema/beans" xmlns:xsi="http://www.w3.org/2001/XMLSchema-instance" xsi:schemaLocation="http://www.springframework.org/schema/beans http://www.springframework.org/schema/beans/spring-beans.xsd"> <bean id="car" class="com.zyh.factory.StaticCarFactory" factory-method="getCar"> <constructor-arg name="num" value="1"></constructor-arg> </bean></beans>9.2实例工厂方法
创建实例工厂类,工厂方法public class InstanceCarFactory { private Map<Integer, Car> carMap; public InstanceCarFactory() { carMap = new HashMap<>(); carMap.put(1, new Car(1, "奥迪")); carMap.put(2, new Car(2, "奥拓")); } public Car getCar(Integer num){ return carMap.get(num); }}<!-- 实例工厂类--> <bean id="instanceCarFactory" class="com.zyh.factory.InstanceCarFactory"></bean><!-- 通过实例工厂获取Car--> <bean id="car1" factory-bean="instanceCarFactory" factory-method="getCar"> <constructor-arg value="2"></constructor-arg> </bean>区别: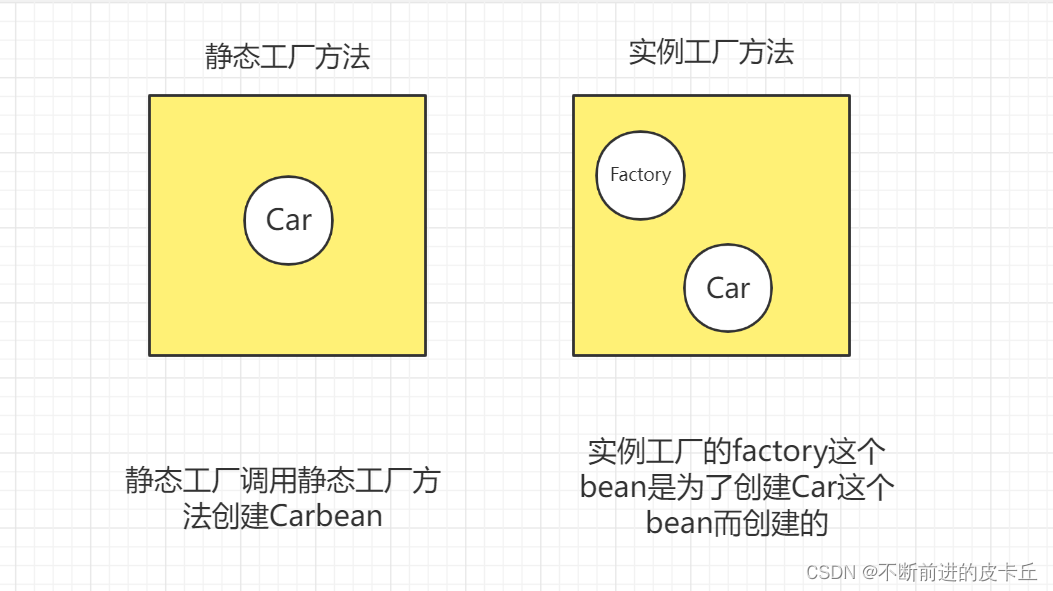
十、Spring IOC 自动装配 autowire
10.1自动装配
自动装载是Spring提供的一种更加简便的方式来完成DI,不需要手动配置property,IOC 容器会自动选择bean来完成注入自动装载有两种方式: byName:通过属性名完成自动装载byType:通过属性对应的数据类型完成自动装载byName的操作如下:
创建Person实体类public class Person { private Integer id; private String name; private Car car; public Integer getId() { return id; } public void setId(Integer id) { this.id = id; } public String getName() { return name; } public void setName(String name) { this.name = name; } public Car getCar() { return car; } public void setCar(Car car) { this.car = car; } @Override public String toString() { return "Person{" + "id=" + id + ", name='" + name + '\'' + ", car=" + car + '}'; }}<?xml version="1.0" encoding="UTF-8"?><beans xmlns="http://www.springframework.org/schema/beans" xmlns:xsi="http://www.w3.org/2001/XMLSchema-instance" xsi:schemaLocation="http://www.springframework.org/schema/beans http://www.springframework.org/schema/beans/spring-beans.xsd"> <bean id="car2" class="com.zyh.pojo.Car"> <constructor-arg name="num" value="1"></constructor-arg> <constructor-arg name="brand" value="奥迪"></constructor-arg> </bean> <bean id="car" class="com.zyh.pojo.Classes"></bean> <bean id="person" class="com.zyh.pojo.Person" autowire="byName" > <property name="name" value="张三"></property> <property name="id" value="2"></property> </bean></beans>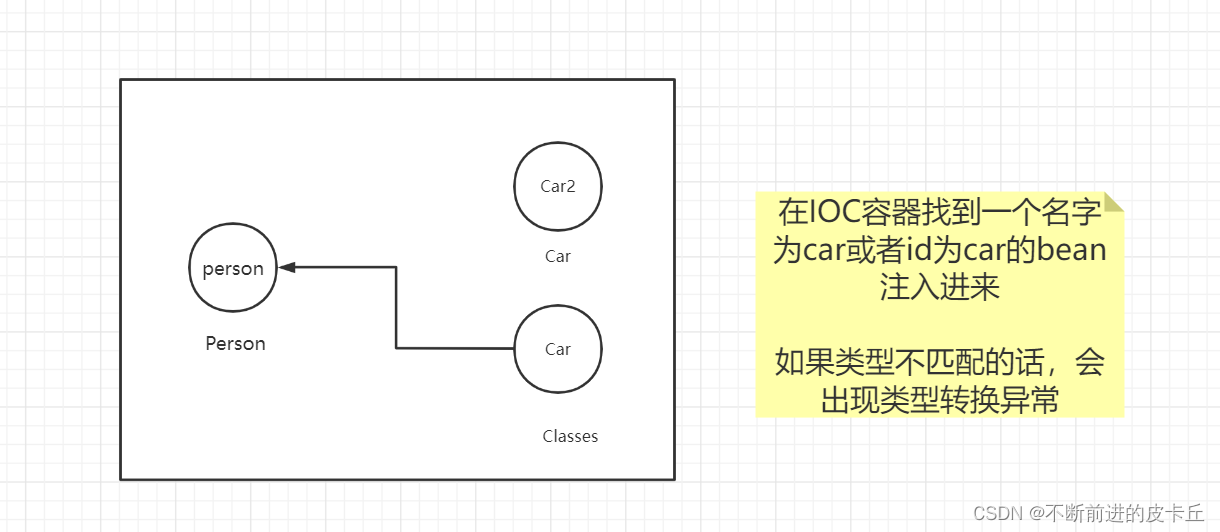
注:如果bean的id有多个一致的,会报错,如Bean name 'car' is already used in this <beans> element
byType的操作如下:
<?xml version="1.0" encoding="UTF-8"?><beans xmlns="http://www.springframework.org/schema/beans" xmlns:xsi="http://www.w3.org/2001/XMLSchema-instance" xsi:schemaLocation="http://www.springframework.org/schema/beans http://www.springframework.org/schema/beans/spring-beans.xsd"> <bean id="car2" class="com.zyh.pojo.Car"> <constructor-arg name="num" value="1"></constructor-arg> <constructor-arg name="brand" value="奥迪"></constructor-arg> </bean> <bean id="car" class="com.zyh.pojo.Classes"></bean> <bean id="person" class="com.zyh.pojo.Person" autowire="byType" > <property name="name" value="张三"></property> <property name="id" value="2"></property> </bean></beans>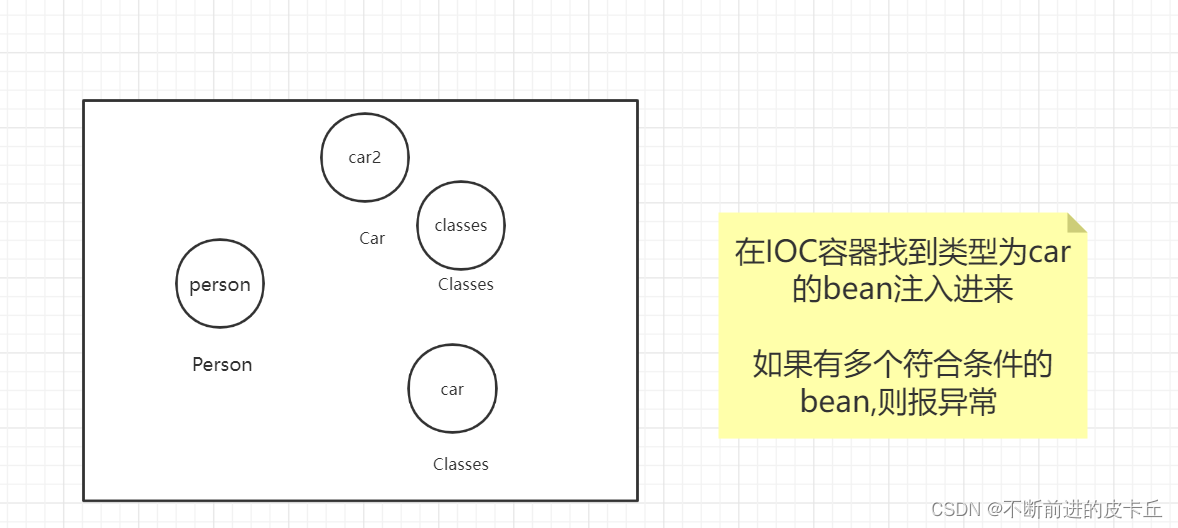
使用byType进行自动装配的时候,必须保证IOC中有且只有一个符合,如果有多个符合,则报下面的异常:
10.2 Spring IOC基于注解的开发
Spring IOC的作用是帮助开发者创建项目中所需要的bean,同时完成bean之间的依赖注入关系,DI
实现该功能有两种方式:
基于注解有两步操作,缺一不可: 配置自动扫包添加注解
<?xml version="1.0" encoding="UTF-8"?><beans xmlns="http://www.springframework.org/schema/beans" xmlns:xsi="http://www.w3.org/2001/XMLSchema-instance" xmlns:context="http://www.springframework.org/schema/context" xsi:schemaLocation="http://www.springframework.org/schema/beans http://www.springframework.org/schema/beans/spring-beans.xsd http://www.springframework.org/schema/context https://www.springframework.org/schema/context/spring-context.xsd"><!-- 配置自动扫包--> <context:component-scan base-package="com.zyh.pojo"></context:component-scan><!-- <bean id="repository" class="com.zyh.pojo.Repository"></bean>--></beans>@Component(value="repository")public class Repository { private DataSource dataSource; public DataSource getDataSource() { return dataSource; } public void setDataSource(DataSource dataSource) { this.dataSource = dataSource; } @Override public String toString() { return "Repository{" + "dataSource=" + dataSource + '}'; }}DI
注解默认的beanid是类名以小写开头,我们可以通过value来设置
如果我们想要把datasource也注入进来需要怎么做呢?
首先我们要把DataSource先扫进来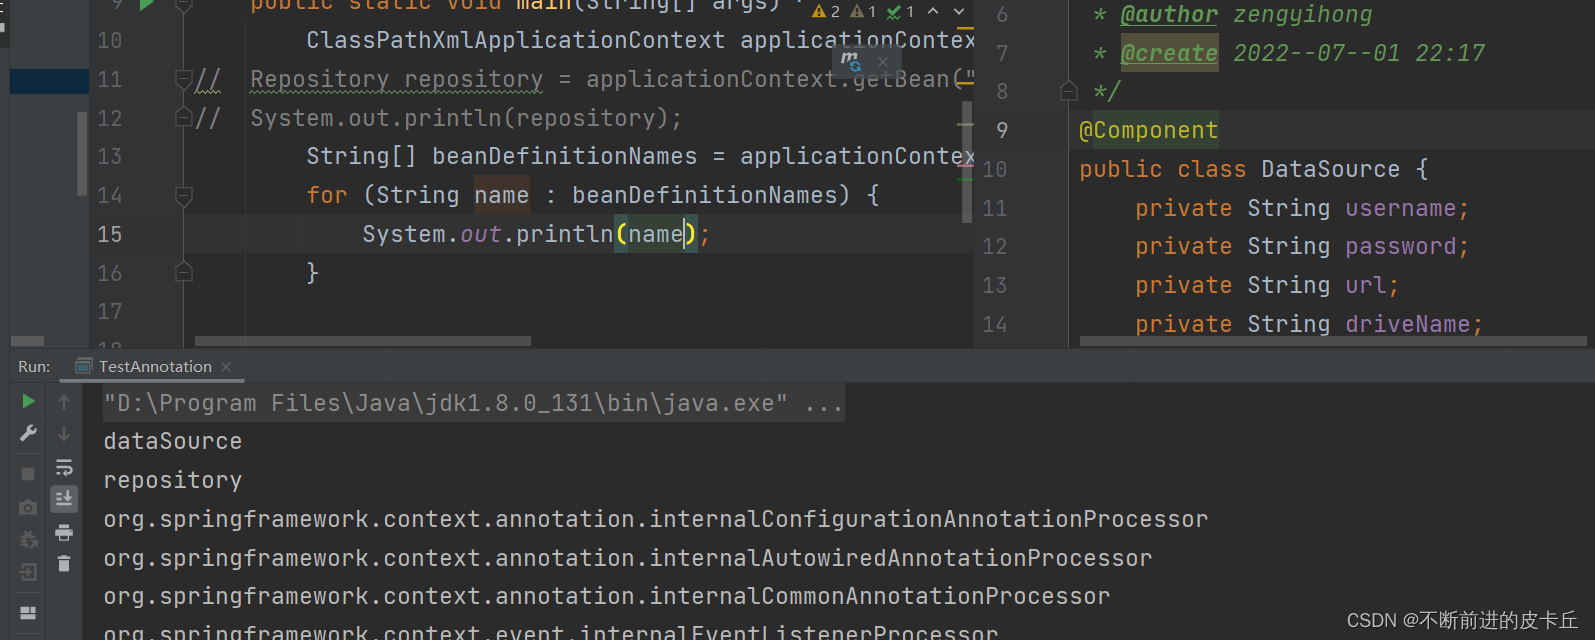
@Componentpublic class Repository { @Autowired private DataSource dataSource; public DataSource getDataSource() { return dataSource; } public void setDataSource(DataSource dataSource) { this.dataSource = dataSource; } @Override public String toString() { return "Repository{" + "dataSource=" + dataSource + '}'; }}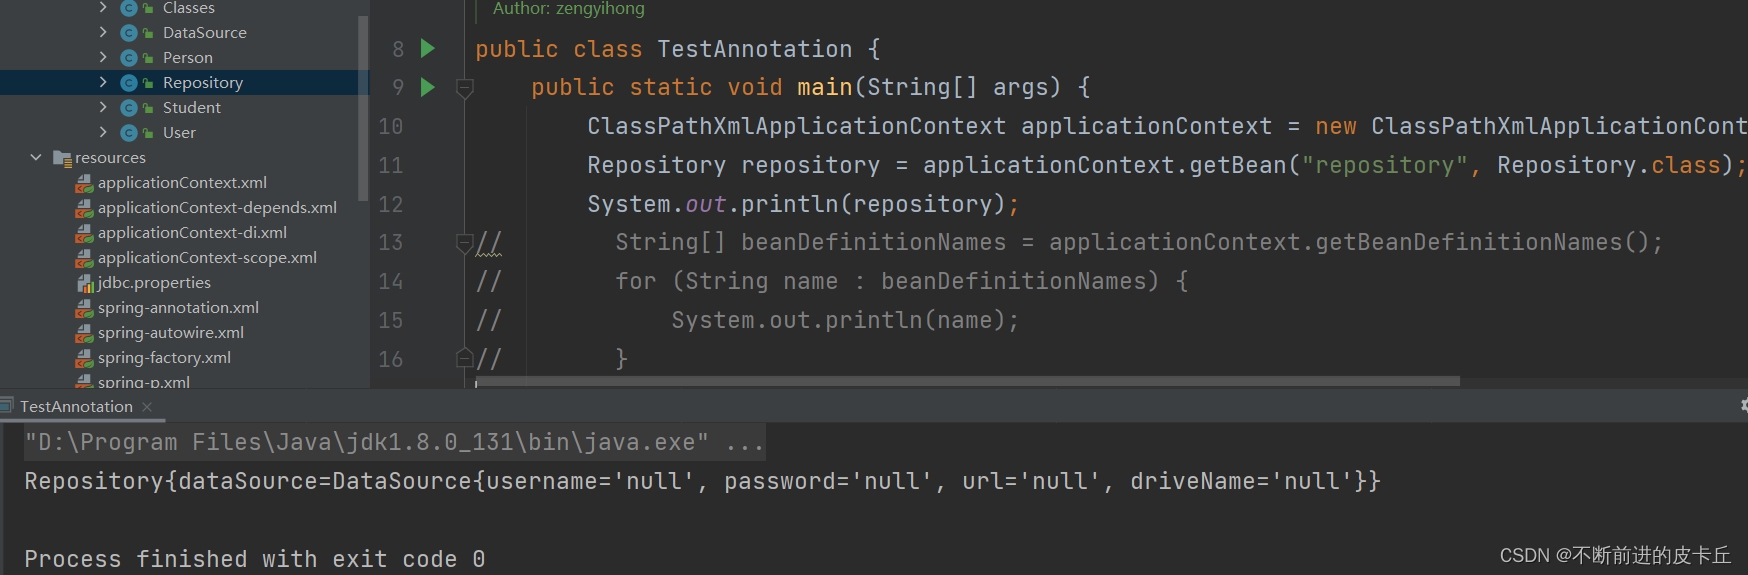
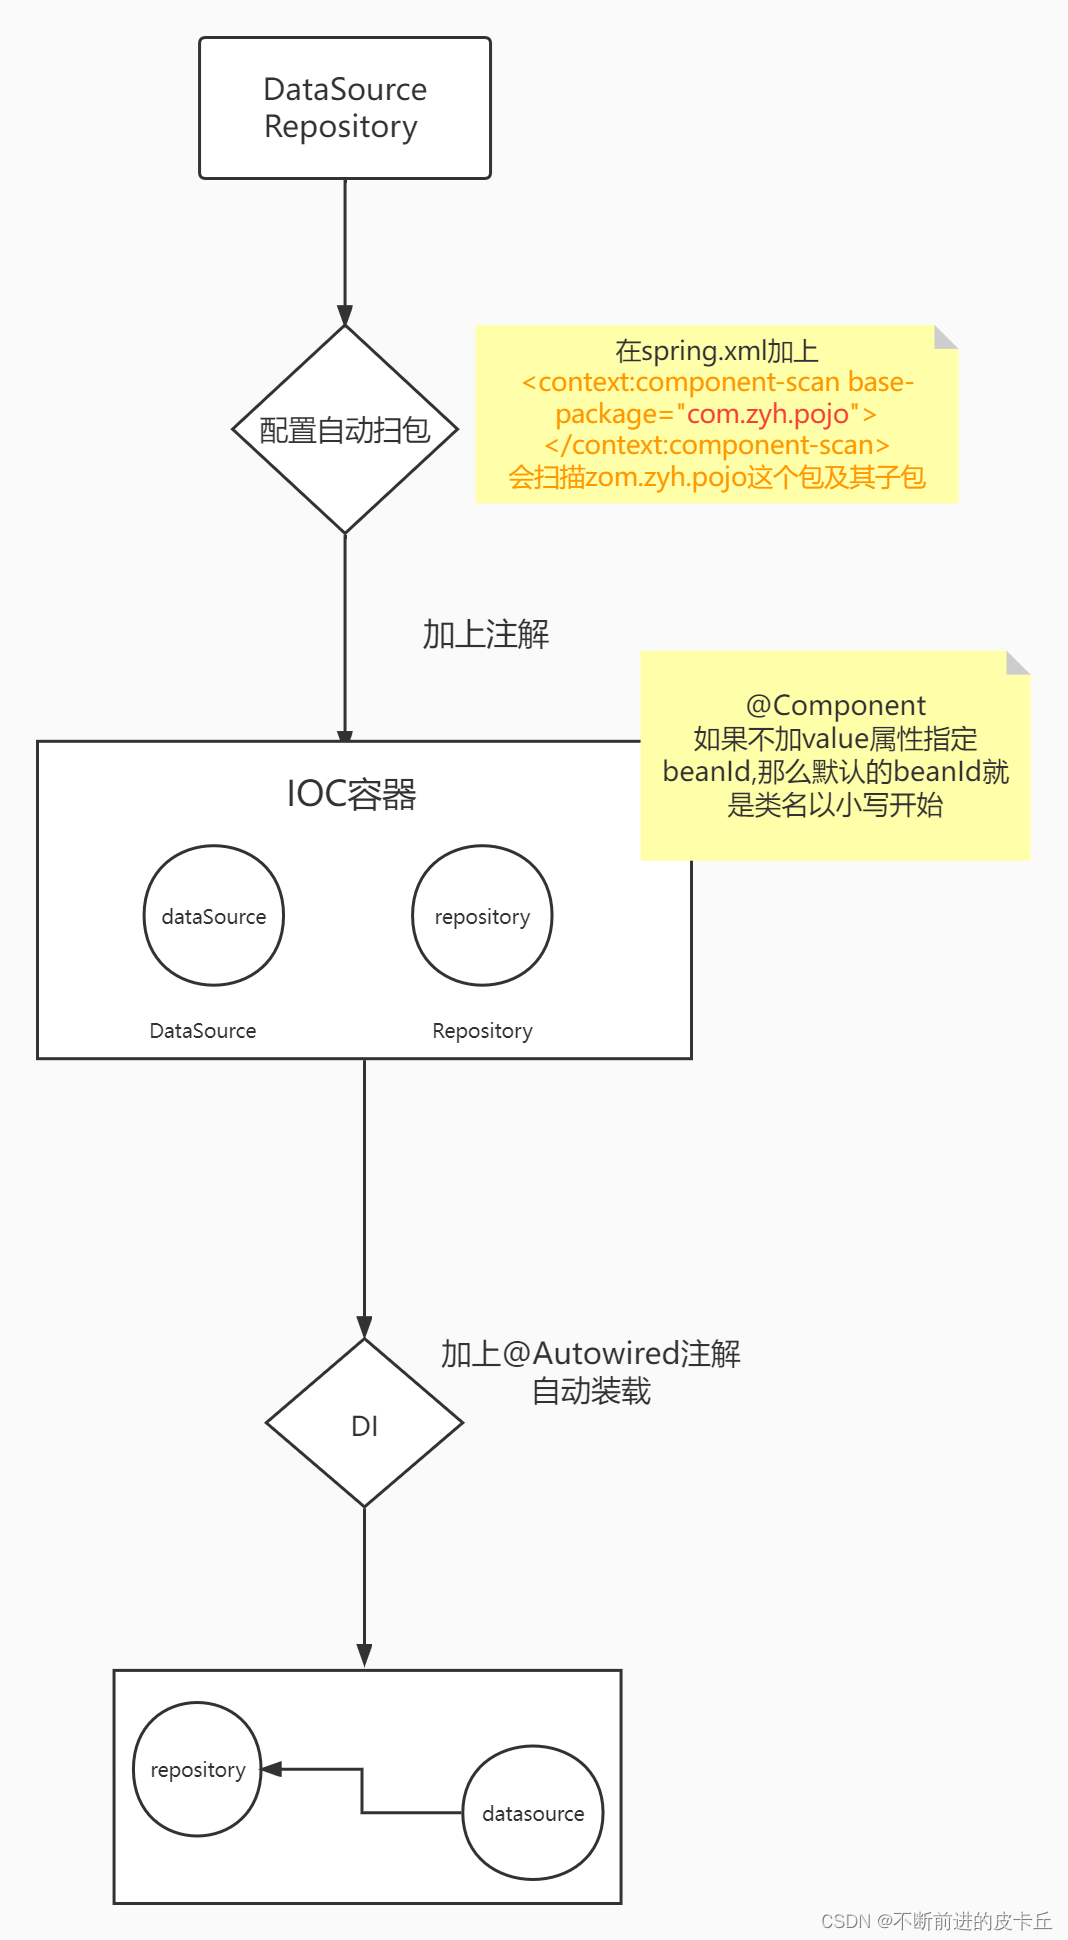
@Componentpublic class Repository { @Autowired @Qualifier(value = "datasource") private DataSource dataSource; public DataSource getDataSource() { return dataSource; } public void setDataSource(DataSource dataSource) { this.dataSource = dataSource; } @Override public String toString() { return "Repository{" + "dataSource=" + dataSource + '}'; }}这表明把IOC中id为datasource的bean注入到repository中
实体类中普通的成员变量(String,包装类等),可以通过@Value注解来赋值
@Componentpublic class DataSource { @Value("root") private String username; @Value("123456") private String password; @Value("jdbc:mysql://localhost:3306/spring") private String url; @Value("com.mysql.cj.jdbc.Driver") private String driveName; }10.3实际开发中的使用
实际开发中我们会把程序分成三层:
ControllerServiceRepository(DAO)关系Controller—>Service---->Repository
@Component注解是把标注的类加载到IOC容器中,实际开发中可以根据业务需求分别使用@Controller,@Service,@Repository注解来标注控制层类,业务层类,持久层类
十一、Spring AOP
AOP (Aspect Oriented Programming) 面向切面编程OOP (Object Oriented Programming) 面向对象编程,用对象化的思想来完成程序AOP是对OOP的一个补充,是在另外一个维度上抽象出对象具体指程序运行时动态地把非业务代码切入到业务代码中,从而实现程序的解耦合,把非业务代码抽象成一个对象,对对象编程就是面向切面编程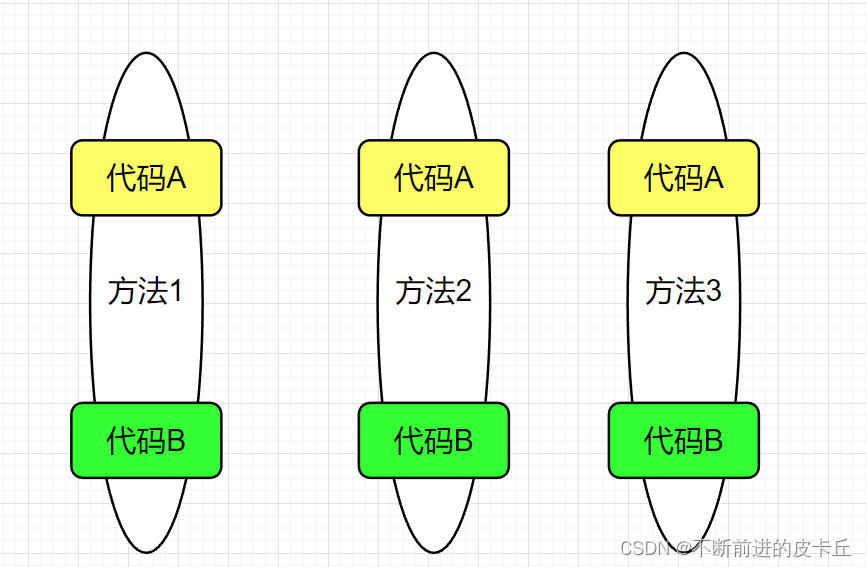 上面这种形式的代码维护性很差,代码复用性差
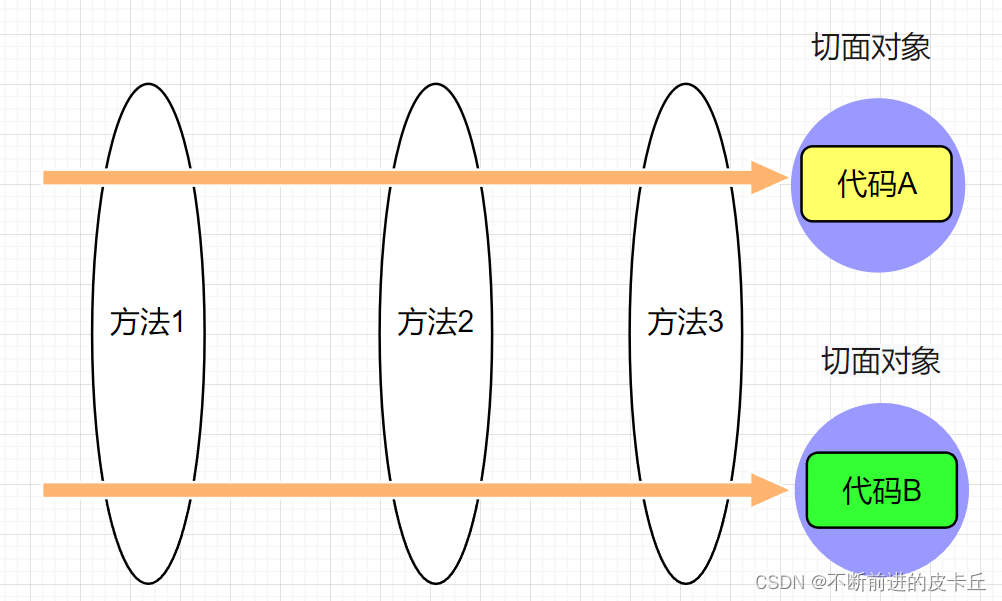
AOP的优点:可以降低模块之间的耦合性提供代码的复用性提高代码的维护性集中管理非业务代码,便于维护业务代码不受非业务代码影响,逻辑更加清晰
通过一个例子来理解AOP。
创建一个计算器接口Calpublic interface Cal { public int add(int num1,int num2); public int sub(int num1,int num2); public int mul(int num1,int num2); public int div(int num1,int num2);}public class CalImpl implements Cal { @Override public int add(int num1, int num2) { int res = num1 + num2; return res; } @Override public int sub(int num1, int num2) { int res = num1 - num2; return res; } @Override public int mul(int num1, int num2) { int res = num1 * num2; return res; } @Override public int div(int num1, int num2) { int res=num1/num2; return res; }}日志打印
在每个方法开始位置输出参数信息在每个方法结束位置输出结果信息对于计算器来说,加减乘除就是业务代码,日志打印就是非业务代码
AOP如何实现? 使用动态代理的方式来实现
代理首先要具备CalImpl的所有功能(实现同一个接口),并且在这个基础上,扩展出打印日志的功能
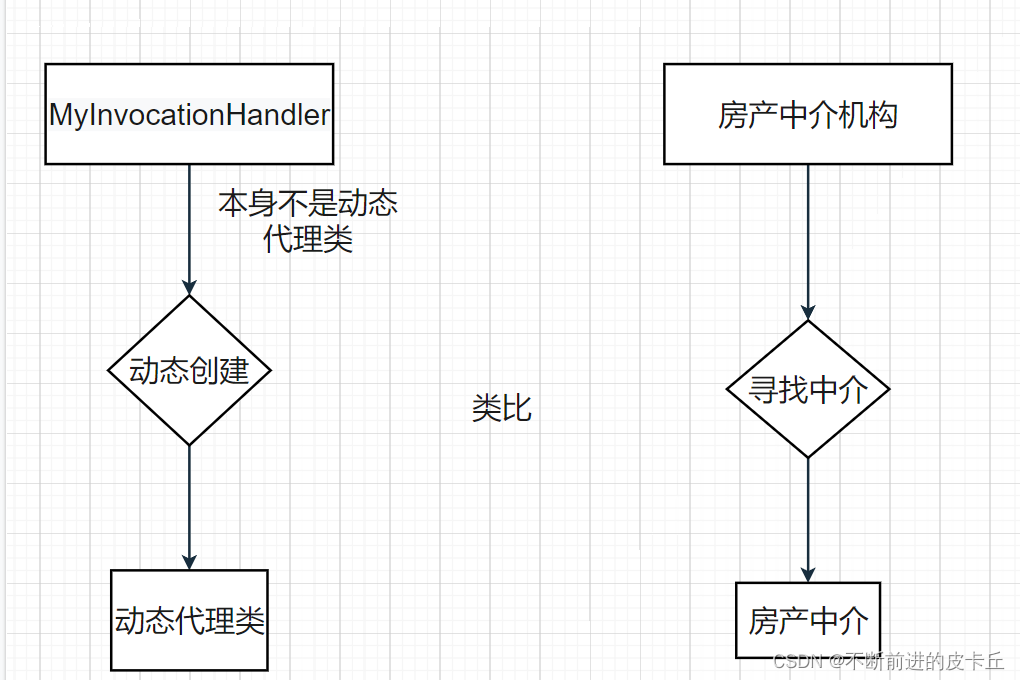
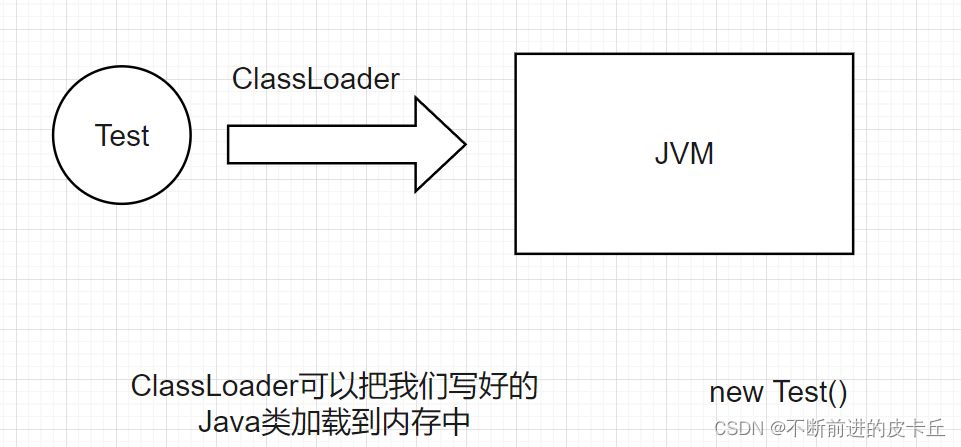
ClassLoader用来把动态生成的类加载到JVM中
代理类需要有和委托类一样的功能,所以委托类和代理类需要实现同样的接口,因此,我们要获取到委托类的接口信息,根据这个接口信息就可以生成一个类,再通过ClassLoader加载到内存里面
public class MyInvocationHandler implements InvocationHandler { //委托对象 private Object object = null; //返回代理对象 public Object bind(Object object) { this.object = object; return Proxy.newProxyInstance(object.getClass().getClassLoader(), object.getClass().getInterfaces(),this); } @Override public Object invoke(Object proxy, Method method, Object[] args) throws Throwable { //实现业务代码和非业务代码的解耦合 System.out.println(method.getName()+"方法的参数是:"+ Arrays.toString(args)); Object res = method.invoke(this.object, args); System.out.println(method.getName()+"方法的结果是:"+res); return res; }}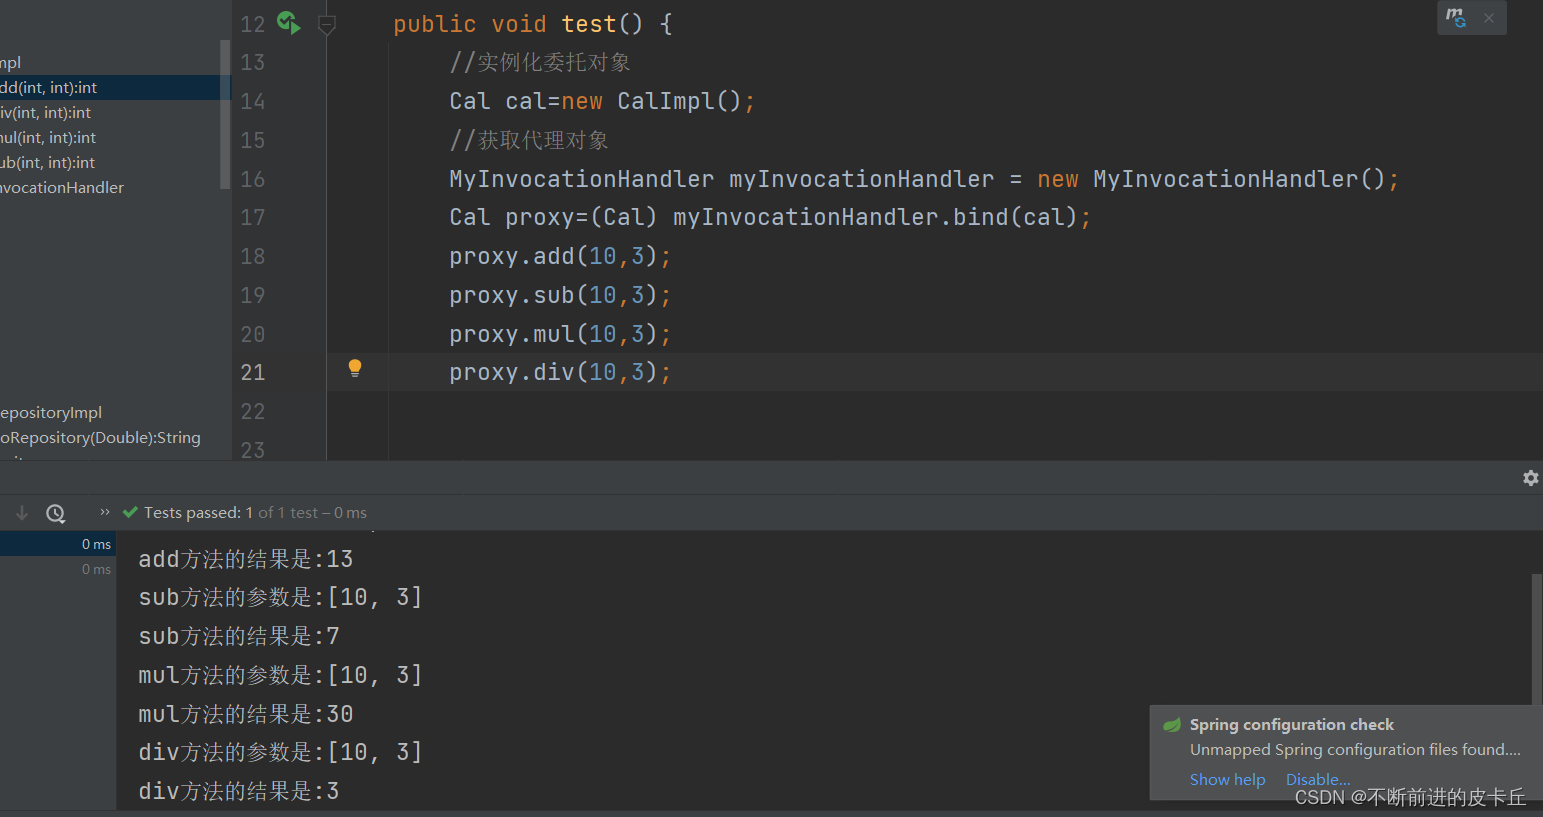
上述代码通过动态代理机制实现了业务代码和非业务代码的解耦合,这是Spring AOP的底层实现机制,真正使用 Spring AOP进行开发的时候,不需要这么复杂
Spring AOP的开发步骤
@Component@Aspectpublic class LoggerAspect { @Before("execution(public int com.zyh.aop.impl.CalImpl.*(..))") public void before(JoinPoint joinPoint) { String name = joinPoint.getSignature().getName(); Object[] args = joinPoint.getArgs(); System.out.println(name + "方法的参数是:" + Arrays.toString(args)); } @After("execution(* com.zyh.aop.impl.CalImpl.*(..))") public void after(JoinPoint joinPoint){ String name = joinPoint.getSignature().getName(); System.out.println(name+"方法执行完毕"); } @AfterReturning(value = "execution(* com.zyh.aop.impl.CalImpl.*(..))",returning = "rs") public void afterReturning(JoinPoint joinPoint,Object rs){ String name = joinPoint.getSignature().getName(); System.out.println(name+"方法执行的结果是:"+rs); }@AfterThrowing(value = "execution(* com.zyh.aop.impl.CalImpl.*(..))",throwing = "ex") public void afterThrowing(JoinPoint joinPoint,Exception ex){ String name = joinPoint.getSignature().getName(); System.out.println(name+"方法抛出异常"+ex);}}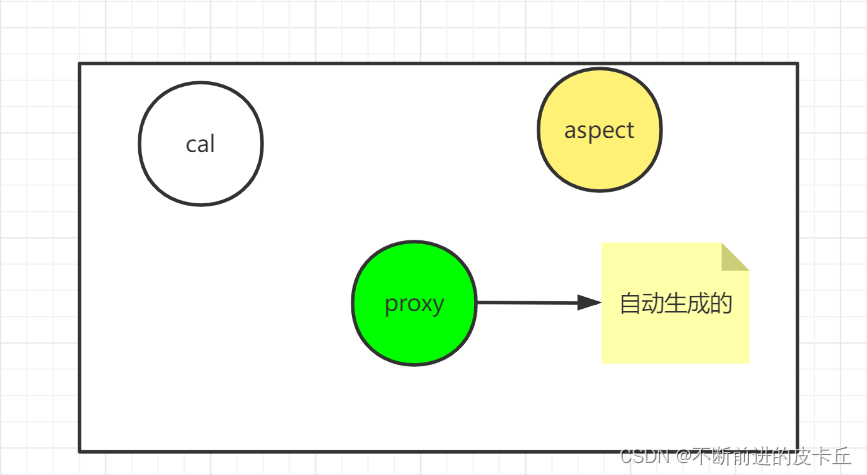 委托类也需要添加@Component
 @Componentpublic class CalcImpl implements Calc{ @Override public int add(int a, int b) { int result=a+b; return result; } @Override public int sub(int a, int b) { int result=a-b; return result; } @Override public int mul(int a, int b) { int result= a*b; return result; } @Override public int div(int a, int b) { int result= a/b; return result; }}3.spring-aop.xml
<?xml version="1.0" encoding="UTF-8"?><beans xmlns="http://www.springframework.org/schema/beans" xmlns:xsi="http://www.w3.org/2001/XMLSchema-instance" xmlns:context="http://www.springframework.org/schema/context" xmlns:aop="http://www.springframework.org/schema/aop" xsi:schemaLocation="http://www.springframework.org/schema/beans http://www.springframework.org/schema/beans/spring-beans.xsd http://www.springframework.org/schema/context https://www.springframework.org/schema/context/spring-context.xsd http://www.springframework.org/schema/aop http://www.springframework.org/schema/aop/spring-aop.xsd"> <!-- 自动扫包--> <context:component-scan base-package="com.zyh.aop"></context:component-scan><!-- 为委托对象自动生成代理对象--> <aop:aspectj-autoproxy></aop:aspectj-autoproxy></beans>4.测试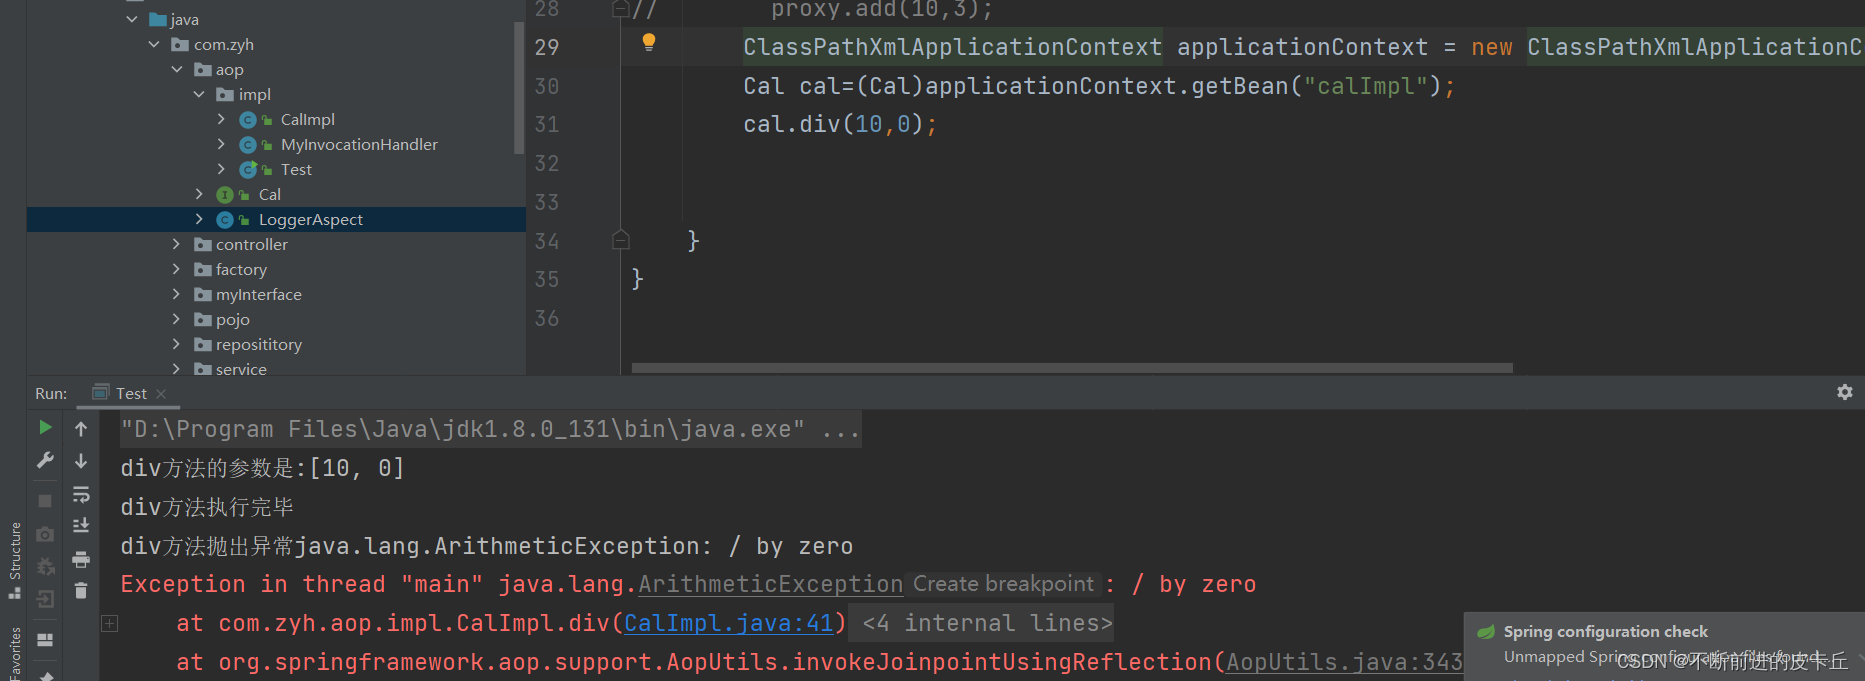
AOP的概念